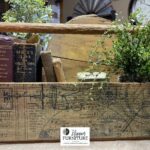
How to Decoupage a Wooden Toolbox
Learn how to we decoupage this rustic wooden toolbox with this tutorial.
Materials
Instructions
- Grab your old wooden toolbox, Soft Matte Gel, and decorative tissue paper of your choosing.
- Wipe wood clean of any grit or grime.
- Lay your paper on your wooden tool box and determine where you want the images to rest best. Trim your paper with scissors for the amount to cover a side. Leave some excess.
- Apply a thin layer of your soft matte gel directly to your wooden tool box. Carefully apply an even coat covering the entire area you wish to add your paper.
- Be extra careful as you add your tissue paper, since this paper is so fragile. Do not let it accidently hit in a spot you don’t want it to remain.
- Next apply your decoupage tissue paper. Press firmly and smooth out any air bubbles as it adheres to the wood. You can use parchment paper or wax paper to ensure every part is adhering perfectly. Be careful!
- Let dry and sit overnight.
- Once completely dry, grab a sanding disc to rub off any excess of your tissue paper.
- Next use your sanding block to smooth the sides of your paper on the edges of your wooden crate. Wipe clean of any debris.
- To seal this project, apply a thin coat of your Soft Matte Gel directly on top. Apply evenly.
- Let sit to dry when complete.