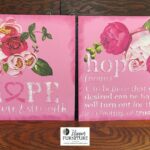
DIY Breast Cancer Sign
Make your own DIY Breast Cancer Wood signs using transfers
Yield: 2 signs
Materials
Instructions
- Grab your wooden boards and apply a base coat of pink paint.
- Dry completely. Use a blow dryer or heat gun to speed up the drying process.
- Once dry, play with placement of stencils and transfer to create a visual plan on your first “HOPE with Ribbon” sign.
- Grab your pieces of floral transfer and apply to your wooden sign. Use your flat edge tool to adhere to the wood. Be careful when applying your transfer because once it sticks it on there.
- Carefully remove your plastic backing slowly as you work.
- Next, let’s add the “HOPE with Ribbon” Stencil.
- Grab your desired color(s) for your stencils by squirting on a plate. I am using a slightly darker pink than my base coat to stencil first. You could leave it as is if you like the subtle look.
- With your pouncers or finger daubers, begin to press your paint gently into your stencil.
- Go back in and add more floral and leaf transfers to fill in the opening up top. Repeat using the same steps as before to apply your transfer.
- Set aside to get started on your other Breast Cancer Wood Sign.
- Bring over your next pink board to begin adding your details.
- Determine which floral transfer pieces you want to add to your board - cut out from your main sheet. Remember to be careful to not let your transfer get ruined by touching anything with the back paper removed.
- For this sign I will build up my transfers a bit more by layering with the pieces up top on my board.
- Once you have created a visual representation of what you want your board to look like as a finished product, begin with your first transfer. Apply your transfer by resting in place, pressing firmly with your tool so the transfer adheres nicely.
- Repeat as you stack all of your transfers on your board.
- Don’t be afraid to layer and have fun with it. Stack them around on your board. Feel free to snip and shift your transfers before you make a final decision as to where to lay them.
- To finish up, grab your “Hope Definition” stencil and with your finger daubers add your darker pink paint first.
- Repeat the steps from above to dry, then reapply your stencil to add your next layer of white paint.
- Once finished with these signs, apply a spray polyurethane to help these cute signs to have a finished look.