Easy DIY Patriotic Crafts
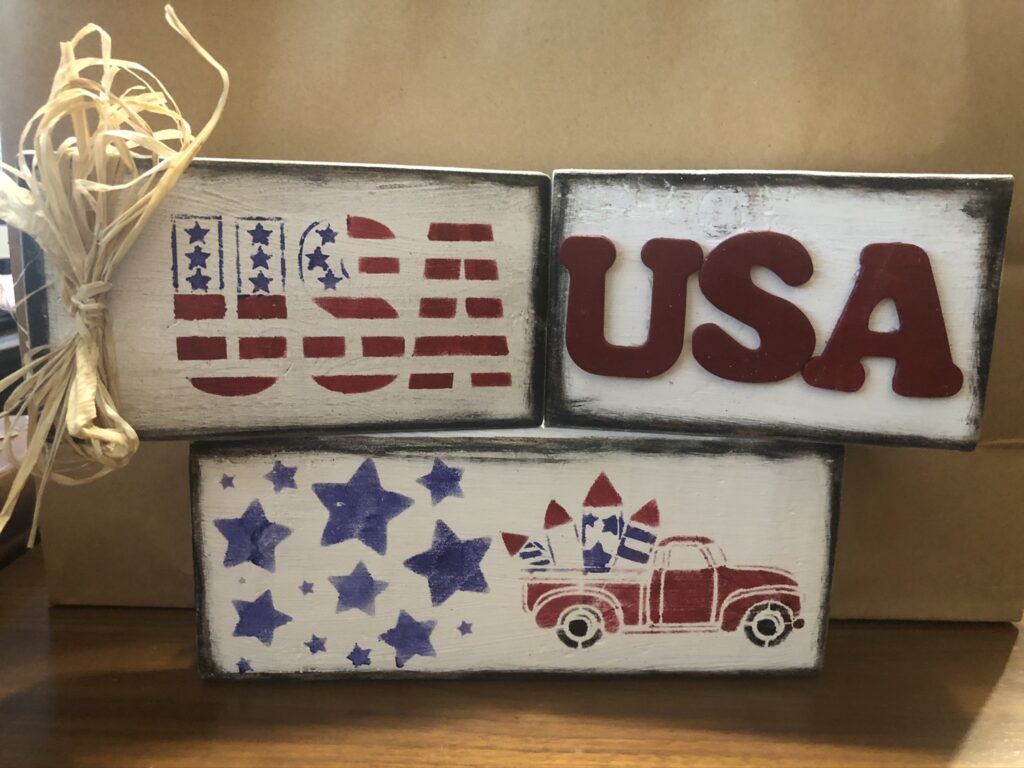
Wood Letter ‘USA” Block
I never thought I’d say this but I’m running out of scrap wood… These projects are draining my stash!
If you’ve been following me, you may have seen my daily lives on Facebook. I have been doing many patriotic projects for Memorial Day and the Fourth of July. Check them out below!
I started by sanding the edges of the wood for nice smooth edges.
Next is a coat of paint! I chose Dixie Belle’s Cotton. If you have an old hairdryer to help dry the paint, then go right ahead but no need to, but for the sake of the video, I use a heat dryer. ?
Then, I finished the edges off with a Ranger Tim Holtz Distress Paint Dauber. (I will link below.)
I had these old wood letters from ages ago. I painted those red with acrylic paint and then glued the ‘S’ down first to establish the middle and then did the ‘U’ and ‘A.’ I used my hot glue gun for the glue.
Stenciled ‘USA’ Wood Block
On this scrap block, I painted it with Dixie Belle’s Cotton and finished the edges with Ranger Tim Holtz Distress Paint like above.
This scrap block I stenciled with a stencil I got from Essential Stencil. (I will link in the Supply List.)
I used Finger Paint Sponge Daubers with acrylic paint.
Then to fill in the blank space, I wrapped raffia around the block into a bow and glued it down.
Stenciled Patriotic Block
I did this block almost exactly like the second block except I finished the edges last.
You just never know how I’m going to do something!
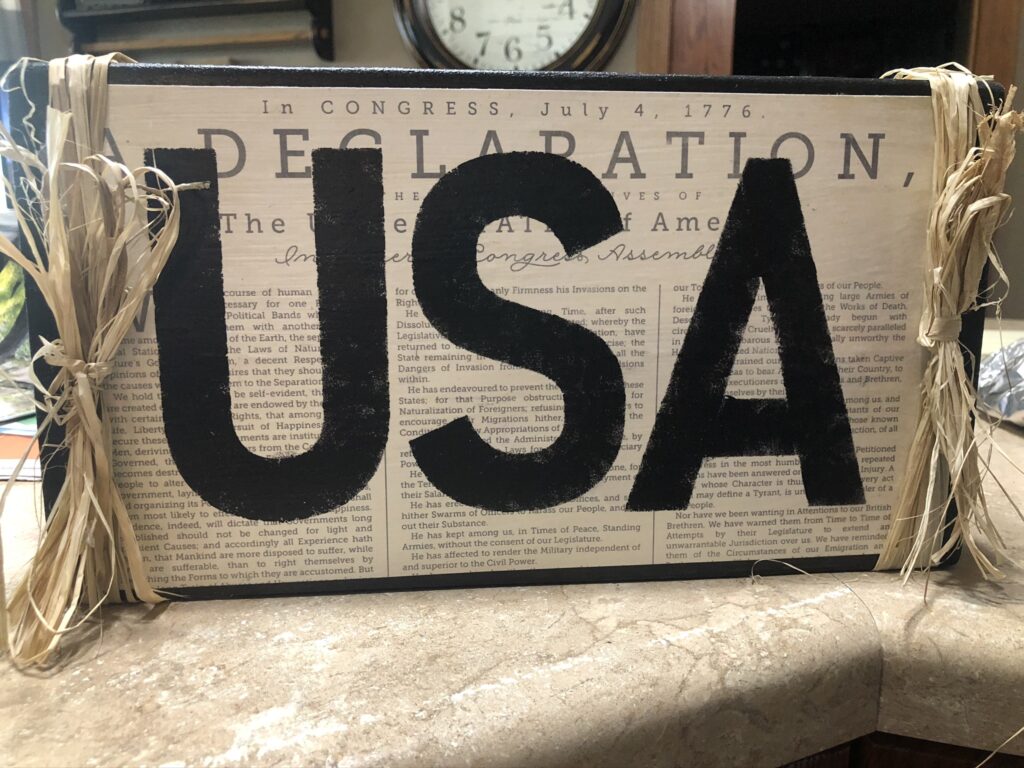
‘USA’ Block
Another woodblock… IMAGINE THAT. This ‘USA’ block I did in neutral colors for me. I absolutely love the Independence Day paper I used!
First, I started with Dixie Belle Caviar Paint around the edges.
Then I picked my scrapbook paper and cut it to the block size.
Then comes the mod podge! Spread a whole coat on the top of the block and lay the paper down. I use a vinyl squeegee to get rid of all air bubbles and all excess mod podge underneath.
These stencils are also from Essential Stencil. (linked below.) I started with the ‘S’ to establish the middle and then did the ‘U’ and ‘A.’ I used finger sponge daubers (linked below) with acrylic paint.
I could have stopped there, but, of course, I had to bring the raffia out again. I wrapped the raffia around both sides and tied into bows securing with hot glue.
Supply List:
- Patriotic Stencil Set – https://bit.ly/2MCL6yz
- 5″ Alphabet Stencil Set – https://bit.ly/3h37vD4
- Dixie Belle Cotton Paint – https://amzn.to/2AenU76
- Dixie Belle Caviar Paint – https://amzn.to/3f0Ac1C
- Ranger Tim Holtz Distress Paint – https://amzn.to/30jEVY2
- Wood Letters – https://amzn.to/3h8HDFJ
- Finger Sponge Daubers – https://flippinfurnitureshop.com/products/jumbo-daubers-pack-of-6-notions
- Raffia – https://amzn.to/30kT5Z3
- Vinyl Squeegee – https://flippinfurnitureshop.com/products/the-blue-tool-hp


You May Also Like
Make Your Own DIY Farmhouse Decor
Two Super Easy Easter Crafts!
