How To Make Funny Signs for Home Decor
Learn how to turn your craft abilities into a little humor for home by making funny signs using stencils and paint that you will not be disappointed in.
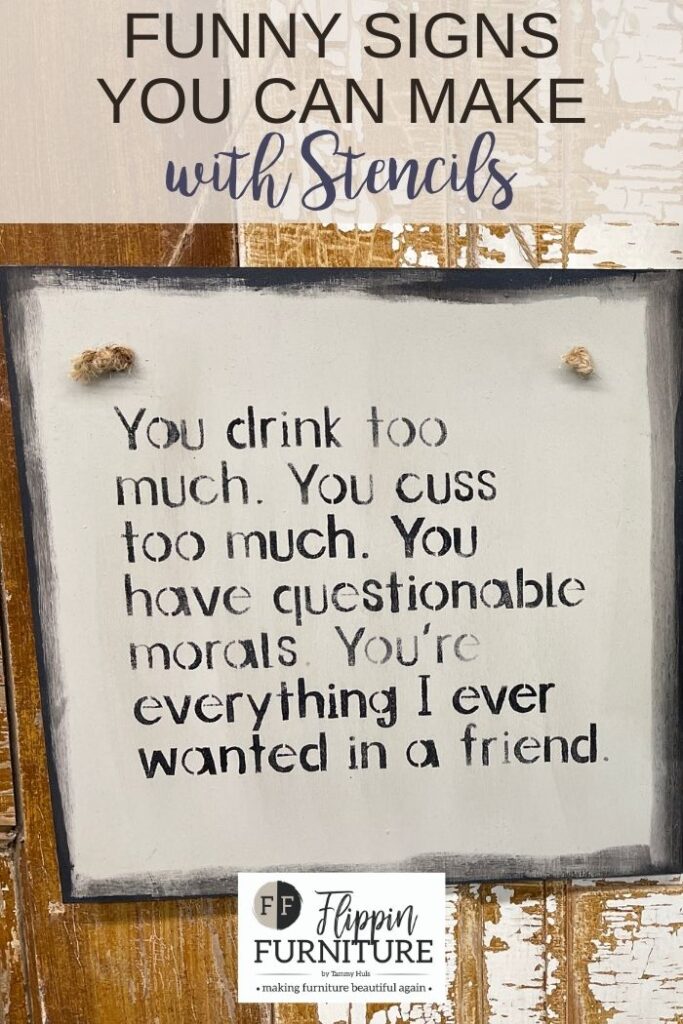
Y’all. If you like to giggle and craft, then this post is for you. I have a pretty big sense of humor and love anything that can make me smile. These DIY Funny Signs are just too cute and comical to not craft. They are bound to make any guest who stops by your home smile, and that is always my goal. You know you giggled when you read those signs. Don’t deny it!
I will be honest. I didn’t love how thin these pieces of wood were when I ordered them. But I sure am loving them now. They are so thin and light that I can easily poke holes right in the top. Then all I have to do is simply attach some twine to be able to hang these cute DIY Funny Signs anywhere I want in my home.
And don’t worry y’all, if you don’t have these exact pieces of wood, they turn out just as cute with any piece of scrap wood, some paint, and an adorable stencil. So if you want to create this look for your home too, grab your supplies, and let’s get started.
Make your Own Funny Signs For Home
So what do you think about these stencils? Aren’t they just so funny? They definitely bring a smile to my face! AND crafting with them to make a comical DIY for my own home, just makes them even more special. I decided to stick with my neutral color palette so it would fit in with the rest of my farmhouse decor. But you don’t have to! With a craft like this, you get to determine the size of your wood, the colors, and the amount of detail. The best part is I did it all with some supplies I have had on hand. (I ordered a big bundle of those wooden boards from Amazon.) Pretty great, right? Let me teach you how to create these signs from start to finish. Just check out these simple steps below!
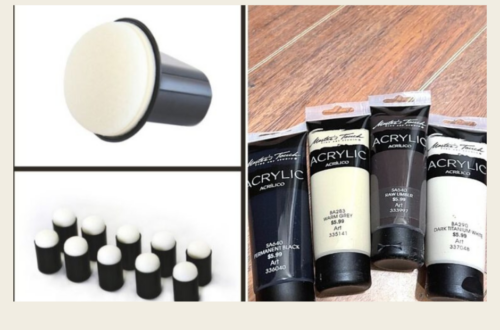
Supplies:
- Wood Board Panels
- Basecoat of your choice of color paint – light tan/cream & black
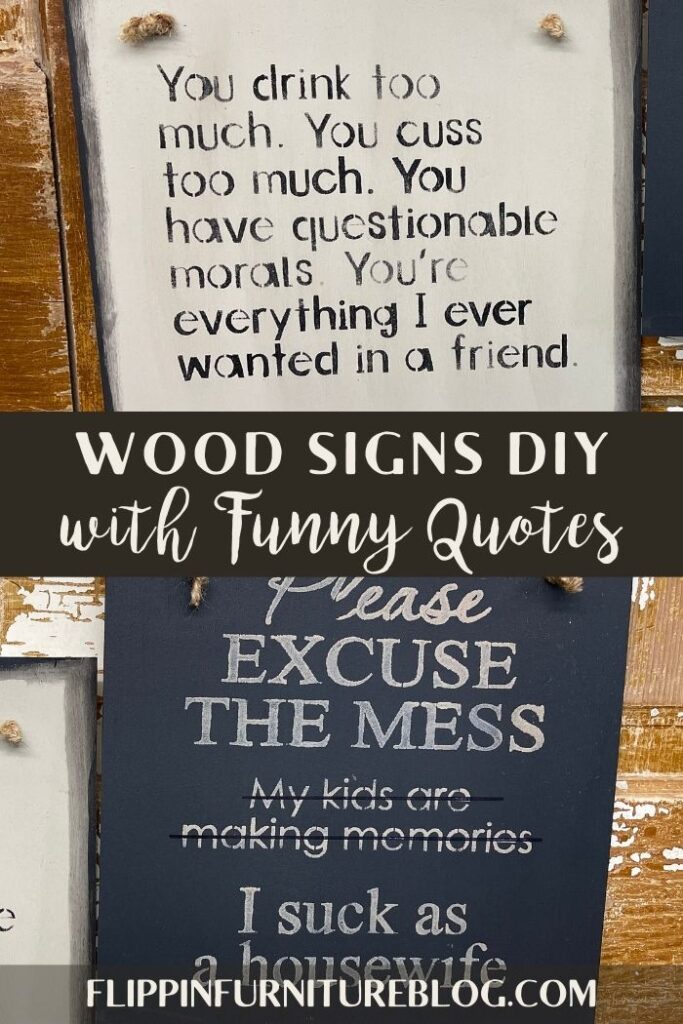
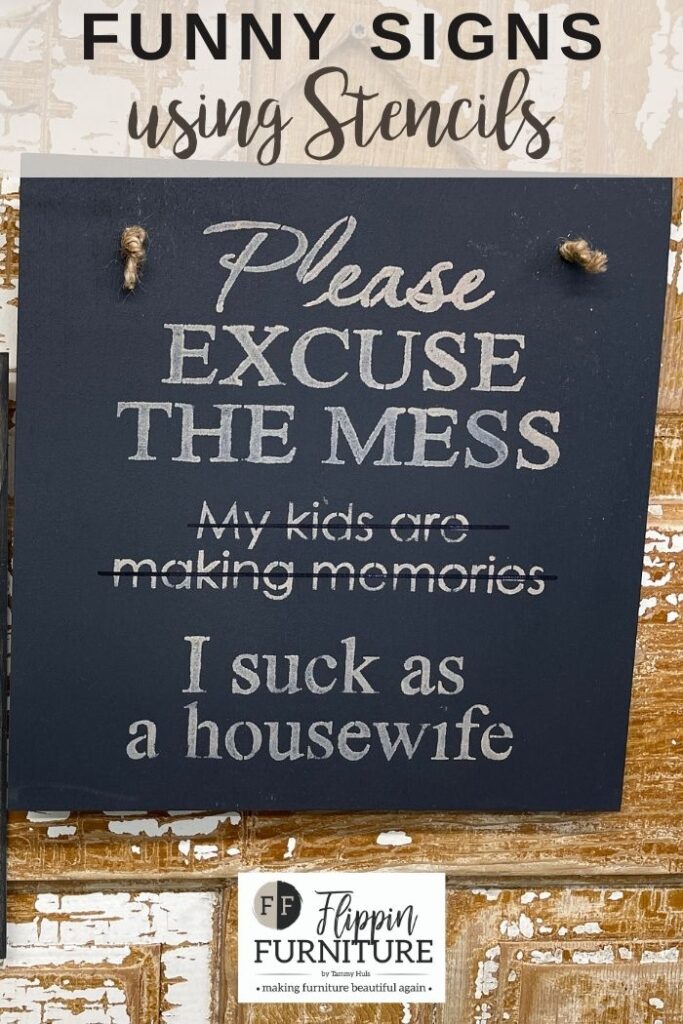
- “Please Excuse The Mess” Stencil
- “You Drink Too Much” Stencil – The Stencil Smith
- Finger Daubers
- Heat Gun
- Jute Twine
- Electric drill
How To Make Funny Signs for home decor
- Grab your thin wooden boards and apply a base coat of paint. You determine the color(s) that works best for your decor. I went with a light tan for one and black for the other. But you do what looks best for your decor.
- Dry completely. Use a blow dryer or heat gun to speed up the drying process.
- Once dry, grab your desired color(s) for your stencils by squirting them on a plate.
- On our first DIY Funny Sign, carefully apply your stencil, “You Drink Too Much” in place on your board. I used my light tan board for this sign.
- With your pouncers or finger daubers, begin to press your paint gently into your stencil. I just used black for the letters for this sign.
- Once complete, gently remove your stencil.
- Add some dimension to your sign by running your finger daubers along the sides. To me, it looks a bit boring without it. Set aside.
- Bring over your next board. I painted my board with a black base. I used the light tan to add lettering with my stencil.
- Repeat the steps from above to add your next stencil, “Please Excuse the Mess” for your DIY Funny Signs Set.
- When dry, poke two holes into the tops of your boards using a tiny drill bit. Use a jute/twine/leather cord to pop through holes. Create a hanger for these DIY Funny Signs to be displayed in your home for all to admire.
Should You Use Just One Color When Filling In A Stencil?
For these signs, I did just use one color for the whole sign. But you do not have to! You can mix and match as many colors as you want. Since I prefer the more neutral colors in my home decor, I tend to stick to that color palette. But y’all do not have to do that. Just have fun and enjoy the entire crafting process, whatever it might be. ANNNNND, the beauty of a stencil is if you don’t like how it looks, no big deal. Just repaint and start from scratch!
What To Do If Your Sign Looks a Bit Boring?
Y’all! I am a fan of sweet and simple when it comes to some crafts. But I don’t ever want my project to look unfinished. That is why I love the distressed look so much. (Ha, that explains why I do it so often.) To get that look, just run a bit of black paint on your finger daubers along the edges of a sign. Don’t push too hard, as you are just adding a new dimension to your sign. Sometimes I even use a sander to roughen up the edges too. Just remember not to go too crazy when distressing friends. Let me know what you think of this technique. It is an easy way to boost your boring sign to something beautiful. See you next time!
How To Make Funny Signs for Home Decor
Materials
- Wood Board Panels 3mm or 1/8"
- Mineral Paint Basecoat of your choice of color paint – light tan/cream & black
- “Please Excuse The Mess” Stencil
- “You Drink Too Much” Stencil
- Finger Daubers
- Jute Twine
- Electric drill
- Heat Gun
Instructions
- Grab your thin wooden boards and apply a base coat of paint. You determine the color(s) that works best for your decor. I went with a light tan for one and black for the other. But you do what looks best for your decor.
- Dry completely. Use a blow dryer or heat gun to speed up the drying process.
- Once dry, grab your desired color(s) for your stencils by squirting on a plate. On our first DIY Funny Sign, carefully apply your stencil, “You Drink Too Much” in place on your board. I used my light tan board for this sign.
- With your pouncers or finger daubers, begin to press your paint gently into your stencil. I just used black for the letters for this sign.
- Once complete, gently remove your stencil. Add some dimension to your sign by running your finger daubers along the sides. To me, it looks a bit boring without it. Set aside.
- Bring over your next board. I painted my board with a black base. I used the light tan to add lettering with my stencil. Repeat the steps from above to add your next stencil, “Please Excuse the Mess” for your DIY Funny Signs Set.
- When dry, poke two holes into the tops of your boards using a tiny drill bit. Use a jute/twine/leather cord to pop through holes. Create a hanger for these DIY Funny Signs to be displayed in your home for all to admire.
Video
Just pin this how to make funny signs for your home tutorial below to find the instructions later!


You May Also Like
How to Decoupage a Wooden Toolbox
Learn How To Stencil