Papier Mache Damask Box Revamp
Do you have an excellent internet service? Mine isn’t bad until I try to do a Facebook Live. We were told that it was fixed, so I went Live. Still blurry. The internet company sent us a new router. As soon as it arrived, I, of course, had to try to go Live ASAP! That is how this makeover came about! I just ran out to my garage, looked around real quick, grabbed a few things, put on some makeup and a bra and hopped on! Only to find out that it was still blurry. My hubby called the company, and the technician would be coming.
Anyway, being forced to drum up something to go Live with in a hurry isn’t all bad. In fact, I really do like how this turned out!
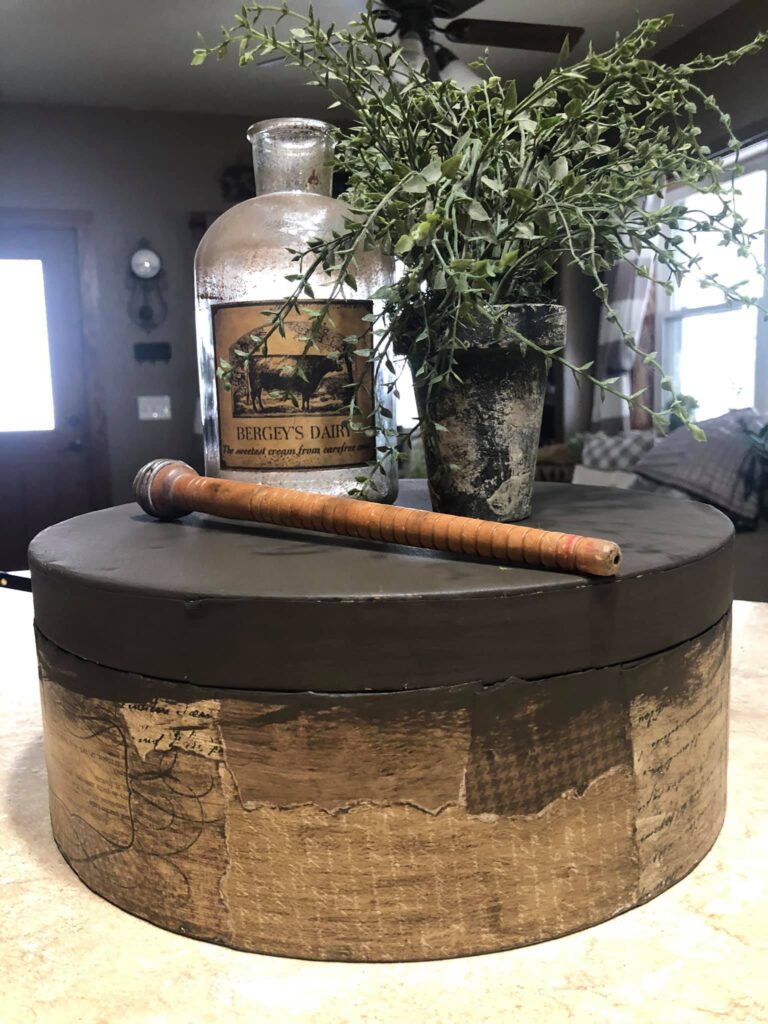
Let me say… This round box was from my ‘Twilight’ faze. I had a ‘Twilight’ themed bedroom. One or two walls were dark red walls, and you can only imagine. My house is now transitioning into neutral and muted colors, so this damask white and black round box wasn’t quite fitting in…


Let’s Get Started!
First, I used a brown glaze on the lid to take away the stark whiteness. I brushed on the glaze and wiped it back off with a paper towel and then put it aside to dry while I worked on the bottom.
For the bottom piece, I tore a bunch of scrapbook papers in random sizes. I wanted to have enough papers to complete the project once I got started with it, and not have to stop and tear up more while I was trying to mod podge. I chose colors that go with my home décor. Black, tans, browns, creams, etc.
I brushed on the mod podge, just a small section at a time, and pressed it down with my fingers to get out any air bubbles or excess mod podge. And I just kept adding pieces of paper and mod podging them down until it was covered all the way around.
Next, I trimmed off any papers that were overhanging and also used a sanding sponge to smooth the edges.
Then I had to decide whether or not I wanted to glaze over the whole bottom piece. I went for it. And I loved it! Same technique as the lid. Brushed on the glaze and wiped it off with a paper towel. And as soon as the glaze was dry, I covered it all with mod podge again.
After I finished the Live, we decided to try my husband’s phone to make sure it wasn’t my phone that was causing the terrible video quality. So then I did another, very short Live, where I decided to paint the lid brown, lol. And that is how I left it.
Now I have a new piece to add some elevation to my vignettes!
Super easy!
I’m wondering what I want to mod podge next!?! The possibilities are endless!!!
Supplies
- Round Box
- Miss Lillian’s Antiquing Glaze in Truffle
- Mod Podge in Matte – https://amzn.to/3c6Hv7a
- Paint Brushes – https://amzn.to/39WgOQI
- Your Choice of Scrapbook Papers
- Scissors
- Paper Towels
- Miss Lillian’s Brown Paint – Swamp Mud
2 Comments
blog
Hi, i read your blog from time to time and i own a similar one and i was just curious if you get a lot of spam feedback?
If so how do you stop it, any plugin or anything you can advise?
I get so much lately it’s driving me crazy so any help is very much appreciated.
Flippin Furniture Blog
I get spam, also. I don’t know of anything you can do about it. Sorry I’m not much help in this area!