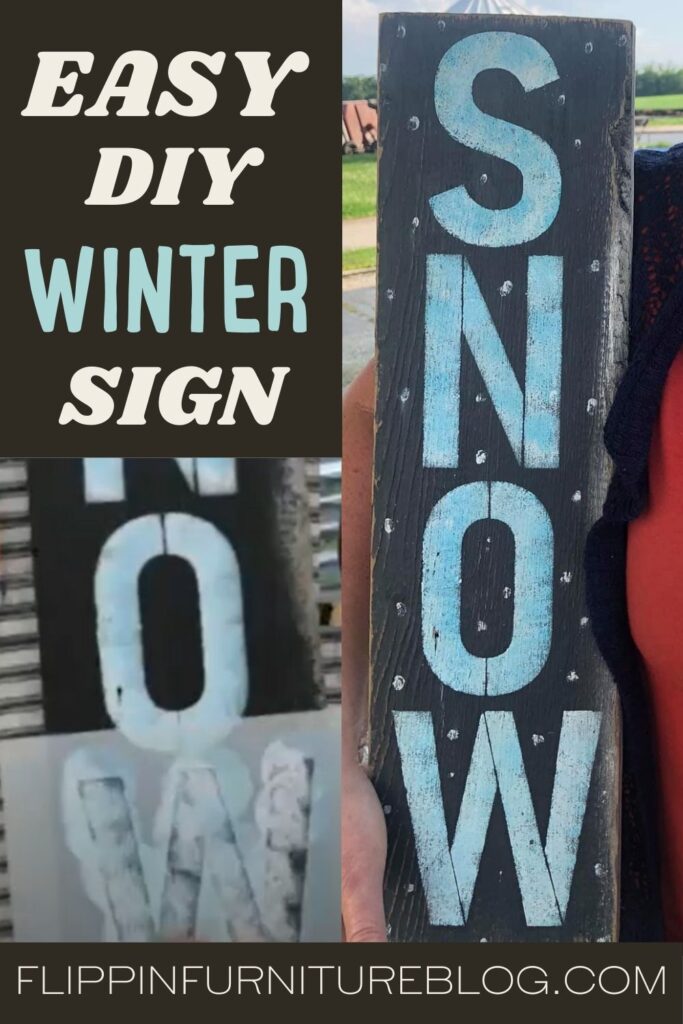
Easy DIY Winter Sign
Are you ready to start decorating for the winter months? Today I am showing you how to make your own DIY winter sign in less than 20 minutes. It’s an easy and simple project that you can make as gifts to friends, loved ones, or just add it to your shop! I love the distressed look and the paint colors this sign brings to my holiday decor.
This year, I was wondering what would be a cute sign that I could have up in my home through all the winter holiday months. After some brainstorming, I decided to paint a wood sign with the word SNOW on it. It is the perfect way to have cute decor that can stay up all winter long and not be to a specific holiday. It reminds me of the AMERICA wood sign I made for my entryway for the 4th of July this year!
Using a piece of wood, stencils, paint, and a sander you too can make your own DIY winter sign by following along with me in this tutorial video. This DIY wood sign makes for the perfect “Christmas in July” project!
Easy DIY Winter Sign
To start this easy DIY wood sign craft you first need to think about where you would like to display this sign. Once you know where it will likely go this will help you determine the size of your wood blank you need to cut or which one to grab from your pile of scarps.
Also, my individual stencil letters are rather large depending on the size of yours will also help determine the size your board will need to be. Keep watching and you will see how my little accident turned into a masterpiece if I do say so myself!
Winter Sign Supplies
Make Your Own Winter Snow Sign with these Instructions
Step 1: To start you will want to find the right size board for your project. Once you have decided on your size you will want to give it a good sanding with your hand sander if your board is rough.
Step 2: Once you prepped your board start by giving it a base color. I choose back for mine. Using a paintbrush cover your board with the paint of your choice.
Step 3: After that base paint is dry you can start stenciling on your letters. If you want to speed up the drying process us a heat gun.
Step 4: I was going to paint my letters white but accidentally mixed the white into some paint I already had on my plate but it turned out fabulous. If you would like the same look I did you will just need to mix white and turquoise paint together. I used my pouncer to fill in the letters of each stencil. I started at the top with the letter “S”.
Step 5: Next, continue adding your letters vertically on your sign. The next letter will be “N”.
Step 6: Now add the letter “O” by stenciling it on. You may have to mix more white and turquoise together and it is ok if it is not exactly the same.
Step 7: Finishing your sign off with your last letter “W” daubing the paint inside your stencil filling in your letter “W” stencil.
Step 8: To add so fun features to your sign you can take a tiny paintbrush and make little small white snowflakes all around the letters that spelled out “SNOW”.
Step 9: Allow time for your letters to dry before continuing on to the next steps.
Step 10: Take a hand sander and go around the edges and distress the sides of your sign. You can even go over the letters a bit to distress them but be very careful.
Step 11: Once it is all dry paint a clear coat over your sign. I prefer to use the Dixie Belle Paint brand for my clear coat.

Easy DIY Winter Sign
Make this cute winter sign for your porch or home office today! It's simple, easy, and takes less than 20 minutes to make!
Materials
- Wood blank
- Paintbrush
- Black Paint
- Daubers
- Clear coat
- Hand sander
- White Paint
- Turquoise Paint
Instructions
- To start you will want to find the right size board for your project. ONce you have decided on your size you will want to give it a good sanding with your hand sander if your board is rough.
- Once you prepped your board start by giving it a base color. I choose back for mine. Using a paintbrush cover your board with the paint of your choice.
- After that base paint is dry you can start stenciling on your letters. If you want to speed up the drying process us a heat gun.
- I was going to paint my letters white but accidently mixed the white into some paint I already had on my plate but it turned out fabulous. If you would like the same look I did you will just need to mix white and turquoise paint together. I used my pouncer to fill in the letters of each stencil. I started at the top with the letter "S".
- Next, continue adding your letters vertically on your sign. The next letter will be "N".
- Now add the letter "O" by stenciling it on. You may have to mix more white and turquoise together and it is ok if it is not exactly the same.
- Finishing your sign off with your last letter "W" daubing the paint filling in your letter "W" stencil.
- To add so fun features to your sign you can take a tiny paintbrush and make little small white snowflakes all around the letters that spelled out "SNOW".
- Allow time for your letters to dry before continuing on to the next steps.
- Take a hand sander and go around the edges and distress the sides of your sign. You can even go over the letters a bit to distress them but be very careful.
- Once it is all dry paint a clear coat over your sign. I prefer to use the Dixie Belle Paint brand for my clear coat.
This DIY winter sign is so easy that you can make multiples to gift to friends as gifts or make to give to a secret Santa at work. You will love how it looks and even better they are such a joy to make!
Just pin this Easy DIY Winter Sign tutorial below to find the instructions later!