How to Stencil on Metal
Stencil on metal and create your own projects in little to no time. Follow along as I teach you all the tips and tricks that you need to know.
To stencil on metal is so simple, and similar to any other stencil project. There are some pretty budget friendly stencils and you could easily complete a few of these projects, from start to finish, in less than an half an hour? Doesn’t all of that sound a little too good to be true.
So once you have the the metal, the paint, and the stencils, you are ready! I am so glad that you are here with me as I share my tips and tricks for how to stencil on metal! Let’s get started!
How to stencil on metal
The technique of stenciling onto metal is SOOO simple. I can’t say enough about stencils. So many options and designs out there to allow you to create anything you want based on your own personal style. They are so much fun and a really easy way to add a new flair to any piece of furniture.
I have been using stencils for a long time. Which has allowed me to be able to try out lots of different tools and paints over the years. When it comes to stenciling it is a skill that over time comes naturally and with time you can honestly do it with your eyes closed. Well, not really but it does become super easy once you find the right tools, paint, and stencils. I promise you with the right tools and paint you will be stenciling like a pro.
Supplies to stencil on metal:
Instructions on how to stencil on metal:
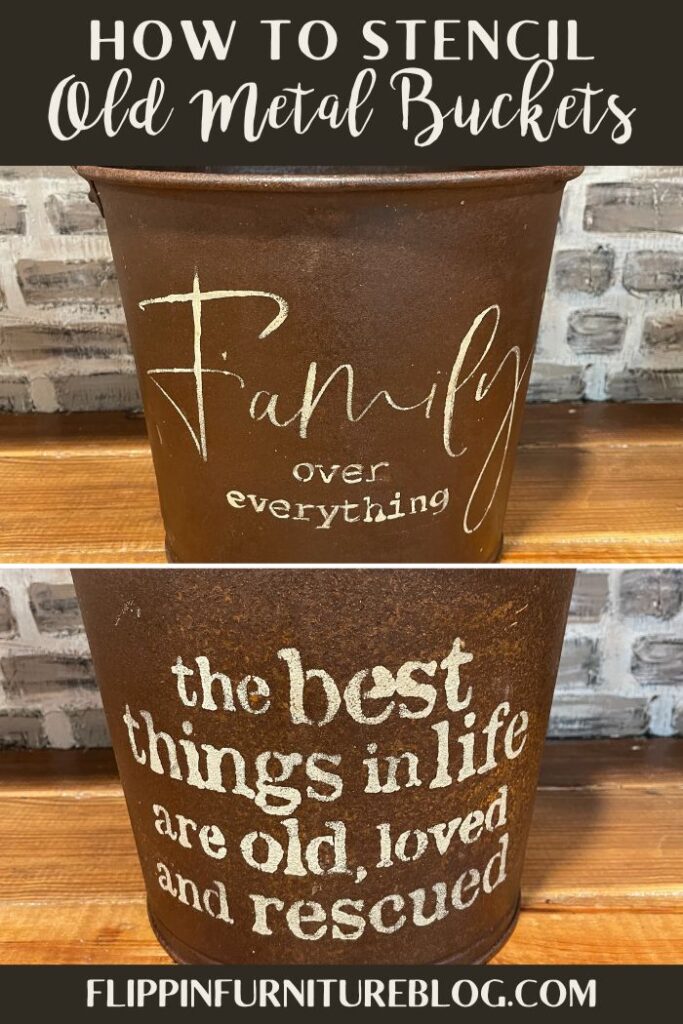
- Take your metal pail..
- Determine which stencil to add on top of your pail.
- Lay your stencil down on your pail, tape it down paying attention to the sides and spacing. Always have a visual plan before you start adding your paint.
- With your pouncer, begin to press your paint gently into your stencil in the desired areas you choose.
- Once you are done filling in the stencil, pull it up carefully.
- If by chance you go over a bit, you can use a baby wipe to help you clean up that area while it is still a bit wet.
- Use your blow dryer to dry the paint.
- Repeat the same process on the other side of the pail.
- Use a paint brush to touch up if needed.
- Sand over the paint slightly.
- Take your wooden block again.
- Determine which stencil to add to the other side of it.
- Lay your stencil down, paying attention to the sides and spacing. Always have a visual plan before you start adding your paint.
- With your pouncer, begin to press your paint gently into your stencil in the desired areas you choose.
- Once you are done filling in the stencil, pull it up carefully.
Frequently asked questions:
What paint should I use when using Stencils?
Naturally, I typically use whichever paint is the closest to me, but in all honestly, I start with finding the right color I want for my project. If I had to pick a brand that is my favorite to use when stenciling I would say it is Master’s Touch acrylic paint from Hobby Lobby. You will find it in the art department. I love it because it is thicker and creamier than a lot of other craft paints.
Some people, like my best friend from high school who is a lifelong crafter, will say to use the more runnier stuff. She loves it but I do not. I think a lot has to do with what you love and what you started off using and are comfortable with. For more on this check out this post.
How to stencil on metal
Materials
Instructions
- Take your metal pail..
- Determine which stencil to add on top of your pail.
- Lay your stencil down on your pail, tape it down paying attention to the sides and spacing. Always have a visual plan before you start adding your paint.
- With your pouncer, begin to press your paint gently into your stencil in the desired areas you choose.
- Once you are done filling in the stencil, pull it up carefully.
- If by chance you go over a bit, you can use a baby wipe to help you clean up that area while it is still a bit wet.
- Use your blow dryer to dry the paint.
- Repeat the same process on the other side of the pail.
- Use a paint brush to touch up if needed.
- Sand over the paint slightly.
- Determine which stencil to add to the other side of it.
- Lay your stencil down, paying attention to the sides and spacing. Always have a visual plan before you start adding your paint.
- With your pouncer, begin to press your paint gently into your stencil in the desired areas you choose.
- Once you are done filling in the stencil, pull it up carefully.
Video
Just pin this how to stencil on metal tutorial below to find the instructions later!


2 Comments
Perry Foss
Start with your block.
Determine which stencil to add on top of your block.
I’m stenciling an old bucket. What kind of block are you referring to?
Thanks!
Flippin Furniture Blog
Sorry! Total mistake on this post. No board, just your pail or bucket. 🙂 I have redone the blog post.