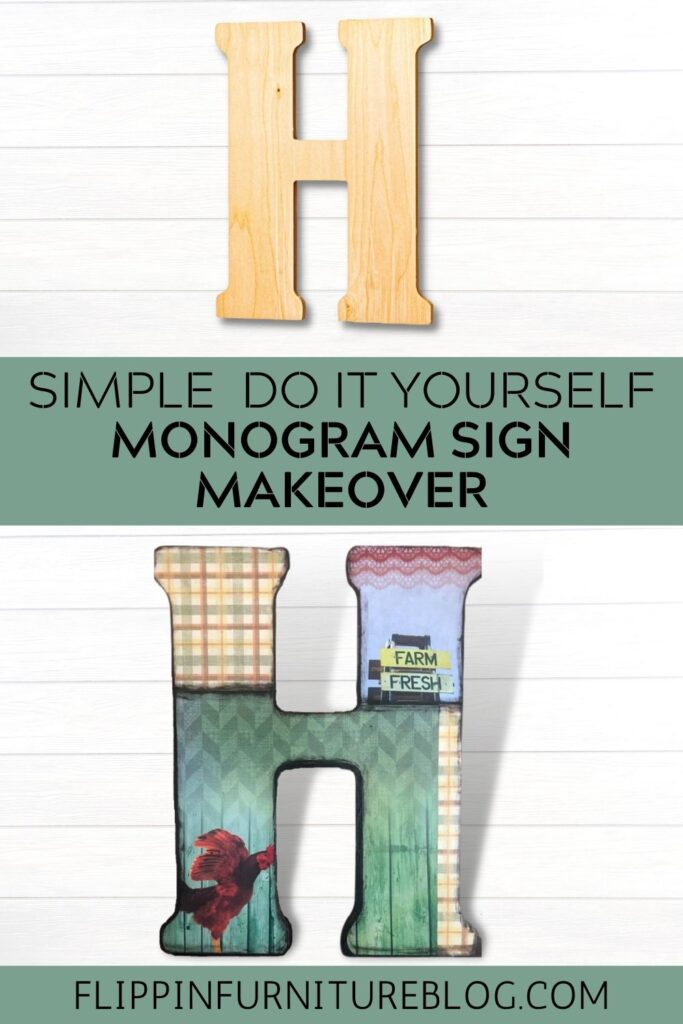
DIY Farm Themed Wooden Letter for Wall
This farm themed wooden letter is easy to make and will look great on the wall. You can even personalize it by painting the border any color you want!
It’s time to decorate! DIY projects are fun and can be made out of anything. I’m taking a monogrammed letter I already had and transforming it into a farmhouse theme. Wooden letters with a farm theme are perfect for the home because they can be changed easily to suit any season. Let’s get started on this project

Farm Themed Wooden Letter for Wall
I love all things farmhouse style. Making this farmed themed wooden letter to hang on my wall was such an easy transformation of a monogrammed letter I already had. With modge podge and farm themed scrapbook paper, I easily transformed this monogrammed letter to exactly what I was wanting.
You can easily do this technique for any theme. All you need is a monogrammed letter and scrapbook paper to match the theme you are wanting and you are all set. Follow the steps below and learn exactly how I transformed a monogrammed letter into a farm themed wooden letter.
Supplies needed to make a Farm Themed Wooden Letter for your wall:
- Paint Dauber
- Black Paint
- Scrapbook paper
- Sponge Paint Brush
- Mod Podge
- Monogrammed Letter
Farmed Themed Wooden Letter for Wall
Materials
- Paint Dauber
- Black Paint
- Scrapbook paper
- Sponge Paint Brush
- Modge Podge
- Monogrammed Letter
Instructions
Paint your monogrammed letter. Make sure you are painting the outside edges making a nice border around the monogrammed wood letter you choose.
Now select the scrapbook paper you wish to modge podge onto your wooden letter and lay your wooden letter on top of the paper. Trace around your letter so you have an outline of what to cut
You will be doing half the letter at a time. That way you can have a different paper on the bottom than the top.
Cut your outline out with scissors and lay on top of your letter. Make sure it will fit if not you may need to do a little trimming.
Repeat cutting and tracing different parts of your letter onto different paper so you can have different patterns and colors on your monogrammed letter.
Now time to modge podge your paper on now that you have them all selected and cut out.
Using your sponge paintbrush apply a heavy coat of modge podge onto a section of your letter at a time. Then apply the scrapbook paper you cut for that section.
Take a squeegee and push out the excess modge podge. Take a paper towel to dab off the excess that gathers at the edges.
You can add make a more unique design by adding patches of scrapbook paper on the sides of another layer of paper.
Once all your scrapbook paper has been applied go back over the paper with some modge podge.
Sand the edges for a more finished look as well as take your paint dauber and touch up any imperfections of the black border you painted before starting.
Step-by-step Instructions for this DIY wall decor:
- Paint your monogrammed letter. Make sure you are painting the outside edges making a nice border around the monogrammed wood letter you choose.
- Now select the scrapbook paper you wish to modge podge onto your wooden letter and lay your wooden letter on top of the paper. Trace around your letter so you have and outline of what to cut
- You will be doing half the letter at a time. That way you can have a different paper on the bottom than the top.
- Cut your outline out with scissors and lay on top of your letter. Make sure it will fit if not you may need to do a little trimming.
- Repeat cutting and tracing different parts of your letter onto different paper so you can have different patterns and colors on your monogrammed letter.
- Now time to modge podge your paper on now that you have them all selected and cut out.
- Using your sponge paintbrush apply a heavy coat of modge podge onto a section of your letter at a time. Then apply your scrapbook paper you cut for that section.
- Take a squeegee and push out the excess modge podge. Take a paper towel to dab off the excess that gathers at the edges.
- You can add make a more unique design by adding patches of scrapbook paper on the sides of another layer of paper.
- Once all your scrapbook paper has been applied go back over the paper with some modge podge.
- Sand the edges for a more finished look as well as take your paint dauber and touch up any imperfections of the black border you painted before starting.
How to hang wooden letters to the wall
I suggest hanging wooden letters to the wall with mounting tape. When using the double-sided mounting tape please remember that a little bit goes a long way. Letters mounted with removable tape can be carefully taken down from the wall without damage, and they will stick right back on. I love this method because I change things around a lot and this allows me to keep changing my decor without damaging my walls.
Can’t wait to see what you create! This is a technique you can use over and over to help transform any wooden letter you find and want to add some personal touch to. Just be creative and have fun.
Just pin this Farmed themed wooden letter for wall tutorial below to find the instructions later!


You May Also Like

How to Turn a Book into Fall Decor
Learn How To Apply A Transfer