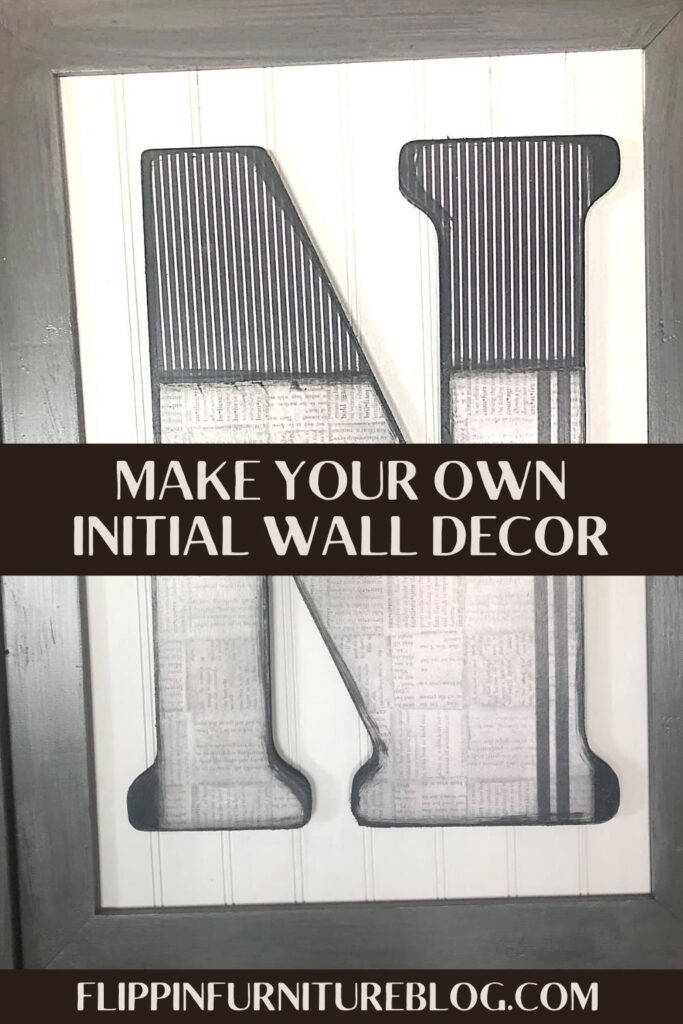
Make Your Own Initial Wall Decor
Follow along step by step as I show you how to make the perfect wall decor with an initial. A perfect craft to make for yourself or as a gift for a friend!
Are you looking for a quick and easy way to decorate your walls? I have the perfect solution! In this blog post, we will be using items that are easily found in any craft store. This initial wall decor project is effortless, but it has a big impact on any room. It’s just one of many ways to get creative with crafts and have some amazing wall decor for your own home.
How to make your own Initial Wall Decor
Earlier I made a DIY farmhouse monogram sign and it was the perfect accessory to my living room. I was wanting to add a little bit more monogrammed decor in a different room and thought I would try making a framed initial wall decor. You too can easily make this for your own home. Just follow along and see just how simple it is!
Supplies needed to make a DIY Initial Wall Decor
- Monogram Wooden Letter
- Folk Art Black Paint
- Thin paintbrush
- Scrapbook pages of your choice
- Squeegee
- Thick paintbrush
- Mod Podge
- Sanding sponge/nail file
- Beadboard (painted white)
- Wooden Frame (painted gray)
Step-by-step instructions for making an Initial Wall Decor
- Grab your wooden initial wall hanging and begin painting all the sides black. You do not have to have full coverage.
- Paint the outer edges around your letter just in case your scrapbook paper doesn’t completely cover your wood as you place later.
- Grab your scrapbook pages you want to use to cover your letter. I am choosing to use 2 different sheets so it is a little less busy, but you can use as many as you want.
- Working in sections on your letter, place your scrapbook paper underneath to trace a portion. I am doing a top and bottom portion.
- Grab your next scrapbook page, and trace out the next section you want to cover. Play with it to create the look you like.
- Cut out your letters about an ⅛” inside the line so I will have some painted wood peeking through as I place.
- Lay your cut out scrapbook pages on your wooden letter, making any adjustments as needed before we begin to Mod Podge.
- Work quickly as you apply the Mod Podge directly to your wood, since we are working with such a large section of scrapbook paper to be attaching.
- Check your positioning before you begin pushing down on your scrapbook paper.
- Grab your squeegee or a spatula, if you like to work in the kitchen sometimes like me, and begin pushing out all the excess Mod Podge under your scrapbook paper.
- Be sure to start in the center as you push and wipe out any excess Mod Podge and work out any air bubbles. Clean up with a paper towel as you work. Make sure there is plenty of Mod Podge hitting the sides of your letter.
- Repeat as you add the next sections of scrapbook paper. If your pages don’t line up perfectly, don’t worry about it. You could always add some twine as an accessory over the area or a little black paint to give it a distressed look.
- You can overlap your pages if you prefer. If your measurements are a bit too long, use a sanding sponge or a nail file to trim excess.
- Take your black paint and with a sponge, add a little thin layer on edges over top of your scrapbook pages to give it a more finished look. Do the same over the joining lines of your scrapbook pages.
- Let dry before applying a thin layer of Mod Podge over the top to seal your letter. If your paint smears a bit, that is okay. It adds a little character to your piece.
- Apply a thin second coat of Mod Podge. Let dry.
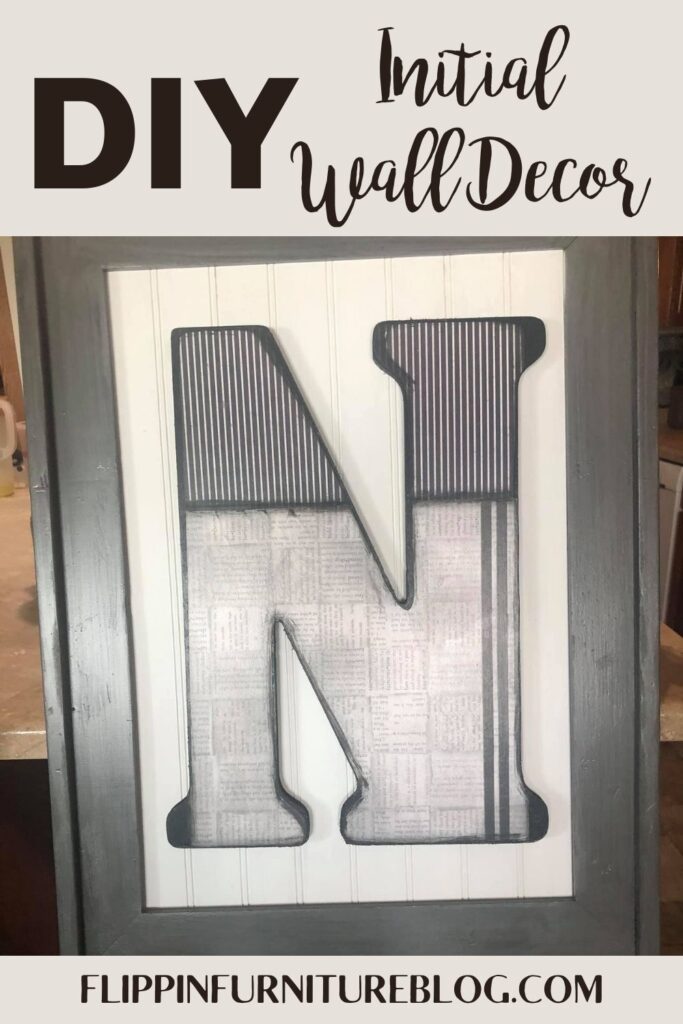
- Attach your completed wooded letter to a sheet of your already painted white beadboard with E6000 to help it stay nice and secure. Be sure it is nice and centered.
- Once E6000 is dry, you will attach your beadboard to an already painted gray frame, securing it well to complete the look of your diy initial wall hanging.

Make Your Own Initial Wall Decor
Learn how to make your own initial wall decor!
Materials
- Monogram Wooden Letter
- Folk Art Black Paint
- Thin paintbrush
- Scrapbook pages of your choice
- Squeegee
- Thick paintbrush
- Mod Podge
- Sanding sponge/nail file
- Beadboard (painted white)
- Wooden Frame (painted gray)
Instructions
- Grab your wooden initial wall hanging and begin painting all the sides black. You do not have to have full coverage.
- Paint the outer edges around your letter just in case your scrapbook paper doesn’t completely cover your wood as you place it later.
- Grab your scrapbook pages you want to use to cover your letter. I am choosing to use 2 different sheets so it is a little less busy, but you can use as many as you want.
- Working in sections on your letter, place your scrapbook paper underneath to trace a portion. I am doing a top and bottom portion.
- Grab your next scrapbook page, and trace out the next section you want to cover. Play with it to create the look you like.
- Cut out your letters about an ⅛” inside the line so I will have some painted wood peeking through as I place.
- Lay your cut out scrapbook pages on your wooden letter, making any adjustments as needed before we begin to Mod Podge.
- Work quickly as you apply the Mod Podge directly to your wood since we are working with such a large section of scrapbook paper to be attaching.
- Check your positioning before you begin pushing down on your scrapbook paper.
- Grab your squeegee or a spatula, if you like to work in the kitchen sometimes like me, and begin pushing out all the excess Mod Podge under your scrapbook paper.
- Be sure to start in the center as you push and wipe out any excess Mod Podge and work out any air bubbles. Clean up with a paper towel as you work. Make sure there is plenty of Mod Podge hitting the sides of your letter.
- Repeat as you add the next sections of scrapbook paper. If your pages don’t line up perfectly, don’t worry about it. You could always add some twine as an accessory over the area or a little black paint to give it a distressed look.
- You can overlap your pages if you prefer. If your measurements are a bit too long, use a sanding sponge or a nail file to trim excess.
- Take your black paint and with a sponge, add a little thin layer on edges over the top of your scrapbook pages to give it a more finished look. Do the same over the joining lines of your scrapbook pages.
- Let dry before applying a thin layer of Mod Podge over the top to seal your letter. If your paint smears a bit, that is okay. It adds a little character to your piece.
- Apply a thin second coat of Mod Podge. Let dry.
Be sure to give this project a try if you are looking for a new way to decorate your rooms. I love how it adds a personalized touch to your room or would be the perfect addition to a gallery wall.
Just pin this Initial Wall Decor tutorial below to find the instructions later!