DIY Distressed Wood Signs
In this step-by-step tutorial, I will teach you, from start to finish, how to make your own DIY Distressed Wood Signs. Scrapwood, paint, stencil, and a sander are all you need! If you are wanting this same adorable look for your home, let me walk you through it!
There is not a piece of wood that I don’t love. No matter the size or shape, I LOVE it. Why you might ask? Well, because I can make adorable DIY Distressed Wood Signs with any piece of wood. So why wouldn’t I love it? Being able to create my own home decor exactly how I want it makes me happy. I bet you feel the same as I do. Or else, why would you be here?

DIY Distressed Wood Signs
I told you I love wood, but I did not tell you how much I love stencils, yet! I LOOOOVE stencils. Stencils are the best way to select your style, size, and overall satisfaction when creating a DIY Wood Sign.
The best part is that all you need is a piece of scrap wood and a stencil of your choosing. I love The Stencil Smith personally, but really any stencil will be just fine. Next, just determine your paint colors, and you are set. You too can make your own home decor to match your style by following these steps below.
Supplies
- 18×12 & 16×12 wood boards
- Black – Fusion Mineral Paint
- Master’s Touch Acrylic Paints – Warm Gray (Tan)
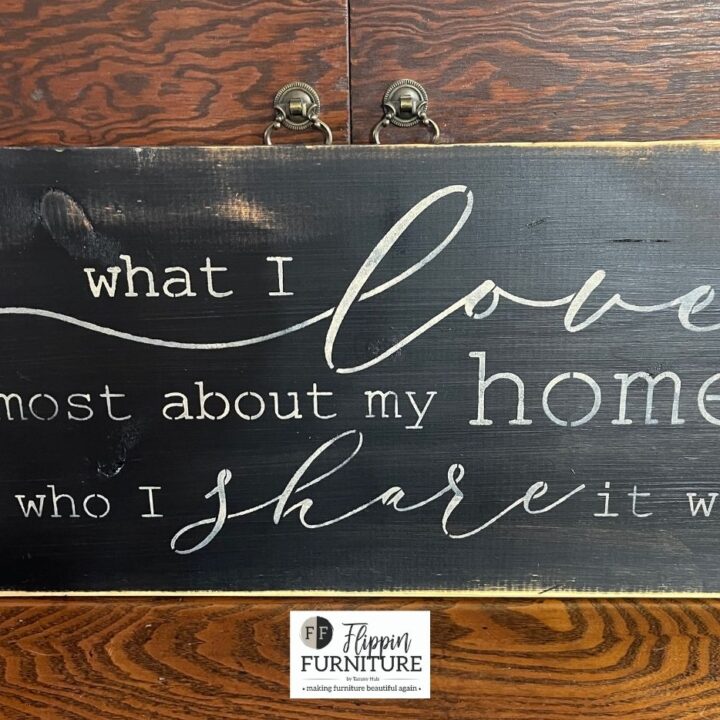
- “What I Love Most About My Home” Stencils – from The Stencil Smith
- “Hangry” – from the Stencil Smith
- Minwax Fast Drying Polyurethane Clear Satin
- Sander – 220 grit
How to Make Your DIY Distressed Wood Sign
- Grab your large wooden rectangular boards. You determine the sizes.
- Apply a coat of black paint all over your entire board. Don’t forget your sides to give a finished look on both boards.
- Use a blow dryer or heat gun to speed up the drying process.
- Once dry, grab your desired colors for your stencils by squirting them on a plate.
- Lay your stencil down on your board, paying attention to holding it in place as you work.
- With your pouncers or finger daubers, begin to press your light-colored paint gently into your stencil. With a large stencil, I start at the top and work from left to right.
- Once you are done filling in the stencil, pull it up carefully.
- Allow your sign to dry completely before moving on.
- To get the distressed look, grab your sander with 220 grit. Simply go along the edges of your sign, being careful not to do too much. It will remove the paint that you placed at the beginning of the craft. Wipe debris clean.
- To seal your sign, add a layer of Minwax Fast Drying Polyurethane Clear Satin starting from the bottom of your sign. Going in lines from left to right to ensure you have complete coverage all the way up on your board. Follow directions on the can for how far to hold the can from the board.
- If you wish to hang your sign, attach the hardware to the back.
How Do You Determine What Size of Wood to Use?
I do not have a fancy pants answer for this. And you might even laugh at my honesty. But when I want to make a sign, I do 1 of 2 things. One option is, to find a stencil that I want to use. Then I will hunt down a piece of scrap wood that will fit nicely. The other option is if I already have a piece of scrap wood the size I want, I stick with it. Then the hunt begins for a stencil I can add that will fit. Ha! I told you it was not a fancy pants answer. I believe in working with what you got and enjoying every minute of it.
Which Thickness Is Best When Working with Stencils?
If anyone ever tries to tell you thickness doesn’t matter, they are wrong. I love to use the 7 Mil Mylar Options when I am working on a smaller project. They are sturdy enough for a limited area to stencil. But if I am stenciling a large sign, I always buy the 10 Mil Mylar Option. They are sturdy. They will last. And, they are easier to take care of so you can use them time and time again. To be honest though, if you take your time when stenciling, you can use either.
Make your Own DIY Distressed Wood Signs
In this step by step tutorial, I will teach you, from start to finish, how to make your own DIY Distressed Wood Sign. Scrapwood, paint, stencil, and a sander are all you need! If you are wanting this same adorable look for your home, let me walk you through it!
Materials
- 18x12 & 16x12 wood boards
- Black - Fusion Mineral Paint
- Master’s Touch Acrylic Paints - Warm Gray (Tan)
- “What I Love Most About My Home” Stencils - from The Stencil Smith
- “Hangry” - from the Stencil Smith
- Minwax Fast Drying Polyurethane Clear Satin
- Sander - 220 grit
Tools
Instructions
- Grab your large wooden rectangular boards. You determine the sizes.
- Apply a coat of black paint all over your entire board. Don’t forget your sides to give a finished look on both boards.
- Use a blow dryer or heat gun to speed up the drying process.
- Once dry, grab your desired colors for your stencils by squirting them on a plate.
- Lay your stencil down on your board, paying attention to holding it in place as you work.
- With your pouncers or finger daubers, begin to press your light colored paint gently into your stencil. With a large stencil, I start at the top and work from left to right.
- Once you are done filling in the stencil, pull it up carefully.
- Allow your sign to dry completely before moving on.
- To get the distressed look, grab your sander with 220 grit. Simply go along the edges of your sign, being careful not to do too much. It will remove the paint that you placed at the beginning of the craft. Wipe debris clean.
- To seal your sign, add a layer of Minwax Fast Drying Polyurethane Clear Satin starting from the bottom of your sign. Going in lines from left to right to ensure you have complete coverage all the way up on your board. Follow directions on the can for how far to hold the can from the board.
- If you wish to hang your sign, attach the hardware to the back.
Just pin this DIY Distressed Wood Signs tutorial below to find the instructions later!


You May Also Like
More Fun with Furniture Transfers!
Two Super Easy Easter Crafts!