How To Stencil Your Own Projects
Stencil your own projects to make your own home decor in little to no time. Follow along as I teach you all the tips and tricks that you need to know about stenciling a wood sign.
Stenciling Your Own Projects
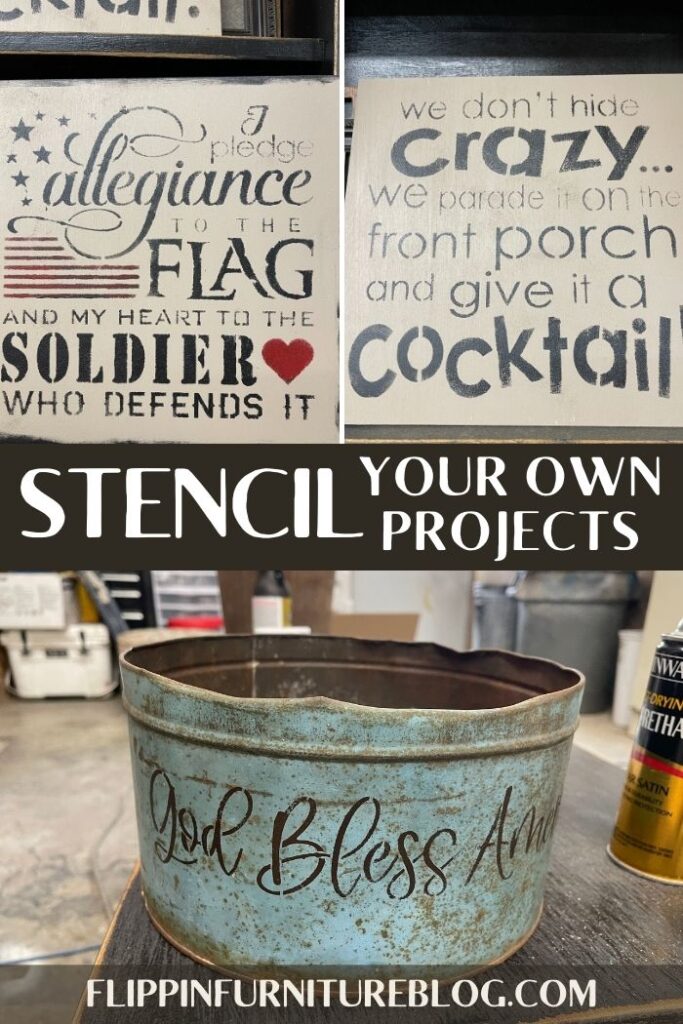
To stencil, your own projects are so simple, and can actually be a bit sassy. Hence the stencil, “We Don’t Hide Crazy.” HA! They are also pretty budget friendly. And did I mention how you could easily complete a few of these projects, from start to finish, in less than an hour? Doesn’t all of that sound a little too good to be true.
So once you have the wood, the metal, the paint, and the stencils, you are ready! I know I am ready to teach you. I am so glad you are here with me as I share my tips and tricks for getting this look for your own desired space wherever it may be. Let’s get started!
Learn to Stencil Your Own Projects
So many pieces of wood/metal and so many stencils that are just screaming for you to show them some love! And I am here to give you that little bit of encouragement to love them. I am happy to inspire you to work with them.
I am excited to teach you step by step how to properly take that piece of wood/metal and a fun stencil from boring to beautiful in little to no time. Painting and stenciling projects is such a simple way to dress up any space in your home, office, camper, classroom, WHEREVER! Follow along as I walk you through this customizable DIY craft that will leave you excited to make many, many more!
Picking the perfect paint color for your base coat and your accent color is the easy part. The hard part is determining which exact stencil you love the most. Believe me, when I say, there are just so many great stencil options out there to choose from. Don’t worry though, once you have become a master at painting and stenciling your own signs, you won’t want to stop. So if you happen to make one for every room in your home with just a piece of scrap wood or metal tin, that is fine. These projects make perfect gifts for friends and family. So you can keep on painting and stenciling for as long as you want! Are you ready to give it a try? Grab your supplies and let’s go!
Supplies:
- Wood board panels
- Metal Tin
- “Number Stencils” Stencil
- “God Bless America” Stencil
- “We Don’t Hide Crazy” Stencil
- “I Pledge Allegiance to The Flag”
- Black, Tan, White, Gray for base coat
- Master’s Touch Acrylic Paints – Black, Warm Gray, Titanium White, Dark Brown, Red
- Dixie Bell Satin Clear Top Coat
- Sander
How to Stencil Your Own Projects
- Grab your wooden board scrap wood and apply a base coat, covering completely. Don’t forget your sides to give a finished look. You can stain your wood or leave raw, if you prefer this look instead.
- Use a blow dryer or heat gun to speed up the drying process.
- Determine which stencil to add on top of your wood piece.
- Once dry, grab your desired color(s) for your stencils by squirting on a plate.
- Lay your stencil down on your board, paying attention to the sides and spacing. Always have a visual plan before you start adding your paint.
- With your pouncers or finger daubers, begin to press your paint gently into your stencil in the desired areas you choose.
- If you are adding multiple colors to your sign, determine which colors to add first and complete all of those desired sections before moving on to your next color.
- Once you are done filling in the stencil, pull it up carefully.
- If by chance you go over a bit, you can use a baby wipe to help you clean up that area while it is still a bit wet.
- If you want to add some texture detail to the sides of your sign, simply sand a bit or add some black edging with your paint dauber.
- To complete, spray your board with a minwax polyurethane spray.
- Certain thin wooden signs can have 2 holes drilled up top so you can add twine to allow for these stenciled signs to be hung. This makes it so they are not just resting on a mantle or bookshelf. Don’t you just love options?
How to Add a Stencil to a Metal Tin
- Keep your patina look or paint if desired. I like it as is personally.
- Tape your “God Bless America” stencil in place, since it is on a curve using blue painter’s tape.
- With your pouncers or finger daubers, begin to press your dark brown paint gently into your stencil phrase on your metal tin.
- Use a blow dryer or heat gun to speed up the drying process.
- Once you are done filling in the stencil, pull it up carefully.
- You do not have to apply a sealer over the top of the metal.
Do You Have To Tape Down Your Stencils?
Y’all I do not ever tape down my stencils when I am working on a flat surface, because I like to cheat as I am stenciling. Sneaking a peak as I add the paint lets me know if I need to continue or make any changes while I am crafting. But when working on a round surface like this metal tin, I used tape to keep me straight and sturdy throughout the process. Sometimes a little bit of tape is a good thing.
What Are the Must Have Colors to Have to Stencil my own sign?
If you have been here for a while, you know I am a neutral kind of gal, through and through. So my answer to this great question is super easy. Neutral colors are my jam! I use dark browns, black, white, and grays in multiple shades for most of my projects.
That does not mean you have to. From time to time I will pop in some bold funky colors, and I promise they turn out just as cute! I like Ocean Green and Lake Blue from Master’s Touch at Hobby Lobby for a beachy vibe.
Just have fun and be creative whatever you decide. The best part of stenciling is if you don’t like it, just paint over it and try again! These crafts are pretty forgiving, and customizable projects which makes them so wonderful. Wouldn’t you agree?

How to Stencil Your Own Projects
Materials
- DeWalt Orbital Sander
- Dixie Bell Satin Clear Top Coat
- God Bless America Stencil
- Number Stencils
- Wood Board Panels
- Master's Touch Acrylic Paint
- Mineral Paint Basecoat of your choice of color paint – light tan/cream; black
- I Pledge Allegiance Stencil https://www.thestencilsmith.com/products/2663-i-pledge-allegiance-and-my-heart?_pos=6&_sid=3c93ddac5&_ss=r&aff=6
Instructions
- Grab your wooden board scrap wood and apply a base coat, covering completely. Don’t forget your sides to give a finished look. You can stain your wood or leave raw, if you prefer this look instead.
- Use a blow dryer or heat gun to speed up the drying process.
- Determine which stencil to add on top of your wood piece.
- Once dry, grab your desired color(s) for your stencils by squirting on a plate.
- Lay your stencil down on your board, paying attention to the sides and spacing. Always have a visual plan before you start adding your paint.
- With your pouncers or finger daubers, begin to press your paint gently into your stencil in the desired areas you choose.
- If you are adding multiple colors to your sign, determine which colors to add first and complete all of those desired sections before moving on to your next color.
- Once you are done filling in the stencil, pull it up carefully.
- If by chance you go over a bit, you can use a baby wipe to help you clean up that area while it is still a bit wet.
- If you want to add some texture detail to the sides of your sign, simply sand a bit or add some black edging with your paint dauber.
- To complete, spray your board with a minwax polyurethane spray.
- Certain thin wooden signs can have 2 holes drilled up top so you can add twine to allow for these stenciled signs to be hung. This makes it so they are not just resting on a mantle or bookshelf. Don’t you just love options?
Video
Just pin this how to stencil your own projects tutorial below to find the instructions later!