Quick and Easy DIY Christmas Sign
Love a simple DIY Christmas sign that’s great for your home? Check out how easy and fun it is to make! I made mine in less than 30 minutes with a few materials from the craft store.
This year I wanted to go away from the traditional bright red and green in my home, but still manage to have that Christmas feel when the time comes. The shape of a Christmas tree helps me keep it in the Christmas decor genre, but the use of neutral colors gives it a new spin. This craft will show you a new way to think outside of the box. Are you ready to get wild, with a little bit of cheetah print, trying something new with me? Let’s go!

Make Your Own Neutral Christmas Sign
“O Christmas Tree, O Christmas Tree,” how lovely are your neutral colors! The remix to this classic song is perfect for a remix to a classic little project. Mixing our tree up with neutral colors could not have turned out any better. I just love how it all came together. This fun craft will definitely be a statement piece up on the ledge of my mantle, which is perfect because I love setting wood decor up there to help decorate for each season!
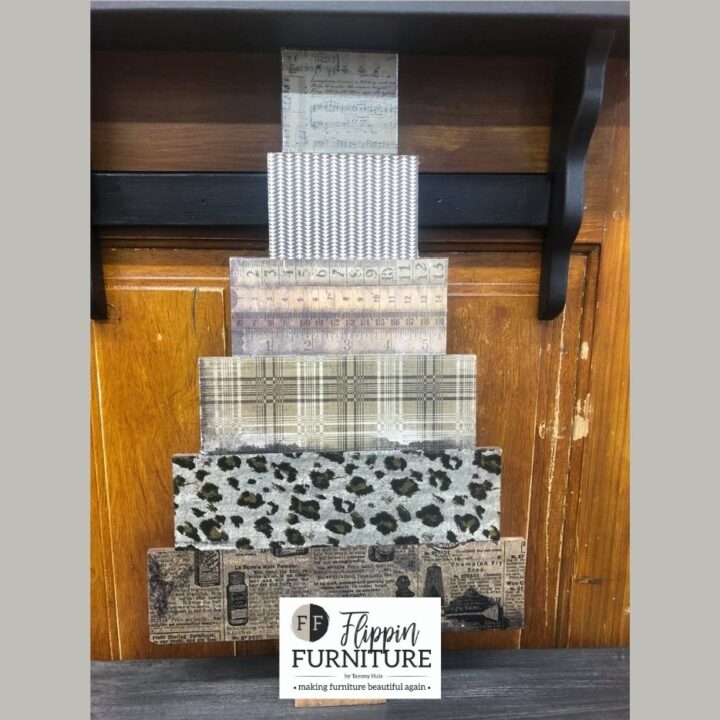
Using an old Christmas tree shape made from pallet wood, neutral colored tissue paper, fancy napkins, and scrapbook pages, and a few other crafting supplies, you can make this Neutral Christmas Tree home Decor Sign. The beauty of this project is you get to decide the colors for your papers applied, so it will work even if you choose to not to do a neutral theme. Be creative and have fun! I can’t wait to see what y’all create. Just follow the steps below and let’s have some fun! One question though, do you love the cheetah print as much as me? I think it makes the whole project pop!
Supplies needed for your Neutral Christmas Sign:
- Pallet wood Christmas Tree
- Soft Matte Gel or Mod Podge
- Saran Wrap, Wax Paper, Aluminum Foil
- Foam Paint Brush
- Heat Gun/dryer
- Scrapbook paper: brown, tans, creams, music notes, plaid, gingham, leopard print, etc.
- Tissue paper and fancy 2-ply napkin
- Paper cutter
- Squeegee/Flat edge tool
- Sanding block
- Fast Drying Acrylic Spray Seal
Instructions to make a Neutral Christmas Sign
- I created this Christmas tree with old pallet wood years ago. Measured, cut to the sizes I needed. Placed a long piece on the back to keep it all together, also serving as the trunk to my Christmas tree.
- Select your neutral sheets of scrapbook paper, 2-ply napkins, and 1 sheet of coordinating tissue paper to cover your tree. Remember I am going for a neutral feel, but you can do whatever you prefer. Same technique will work for all styles.
- Beginning with the bottom layer of my tree, I am using a sheet of tissue paper. I wanted to have a solid piece for this layer and scrapbook paper was not quite long enough.
- Apply a thin layer Soft Matte Gel, or Mod Podge, and carefully add your tissue paper of choice. It is very delicate to work with.
- With saran wrap, wax paper, or even foil, lightly smooth out your tissue paper, helping it adhere to the gel and work out any wrinkles or air bubbles.
- Trim excess paper with a razor blade, being extra careful not to rip.
- For my next layer, I am using a fancy 2 ply-napkin. You know me, I love a good cheetah print. Remove the back layer of your napkin, and cut a section to cover that latter of your tree. Leave some excess on there.
- Apply the same way, working very carefully, as it is also very fragile as the tissue paper.
- Use a small hand sanding block to help rub off excess from sides.
- Decide on which style of scrapbook paper you want to have as your next layer of tree. Use your paper cutter to trim the amount you need. I always have the hardest time with this part, but this is where you make the project your own.
- Apply a thin layer of Mod Podge on your tree, and then apply your cut scrapbook sheet. Pay attention to placement.
- Use a squeegee or flat edge tool, pressing down to push or any excess Mod Podge under the paper.
- Wipe the excess from your squeegee and on your tree with a paper towel.
- Repeat for the remaining layers of your tree.
- Use a sanding block to remove any excess overhang of your scrapbook pages on your tree.
- You can also rough up the edges of your tree layers with the sanding block, to add a rustic feel if you desire.
- Rub excess debris so your surface is clean.
- Once you are happy with the look of your tree, seal it with a layer of Mod Podge.
I hope you have enjoyed this DIY Christmas sign project. It is a simple and cheap way to dress up your home décor for the holidays. One of my favorite things about DIY projects are all the possibilities. You can always change things around if you don’t like it!
This was an amazing DIY Christmas sign that’s great for your home. Have you made a DIY project like this before? I’d love to see your version of this DIY Christmas sign! If you use the same supplies as me, feel free to share on my Facebook page.
Neutral Christmas Tree Home Décor Sign
Learn how to make this simple and fun DIY Christmas sign for your holiday decor!
Materials
- Pallet wood Christmas Tree
- Soft Matte Gel or Mod Podge
- Saran Wrap, Wax Paper, Aluminum Foil
- Foam Paint Brush
- Heat Gun/dryer
- Scrapbook paper: brown, tans, creams, music notes, plaid, gingham, leopard print, etc.
- Tissue paper and fancy 2-ply napkin
- Paper cutter
- Mod Podge
- Squeegee/Flat edge tool
- Sanding block
- Fast Drying Acrylic Spray Seal
Instructions
- I created this Christmas tree with old pallet wood years ago. Measured, cut to the sizes I needed. Placed a long piece on the back to keep it all together, also serving as the trunk to my Christmas tree.
- Select your neutral sheets of scrapbook paper, 2-ply napkins, and 1 sheet of coordinating tissue paper to cover your tree. Remember I am going for a neutral feel, but you can do whatever you prefer. Same technique will work for all styles.
- Beginning with the bottom layer of my tree, I am using a sheet of tissue paper. I wanted to have a solid piece for this layer and scrapbook paper was not quite long enough.
- Apply a thin layer Soft Matte Gel, or Mod Podge, and carefully add your tissue paper of choice. It is very delicate to work with.
- With saran wrap, wax paper, or even foil, lightly smooth out your tissue paper, helping it adhere to the gel and work out any wrinkles or air bubbles.
- Trim excess paper with a razor blade, being extra careful not to rip.
- For my next layer, I am using a fancy 2 ply-napkin. You know me, I love a good cheetah print. Remove the back layer of your napkin, and cut a section to cover that latter of your tree. Leave some excess on there.
- Apply the same way, working very carefully, as it is also very fragile as the tissue paper.
- Use a small hand sanding block to help rub off excess from sides.
- Decide on which style of scrapbook paper you want to have as your next layer of tree. Use your paper cutter to trim the amount you need. I always have the hardest time with this part, but this is where you make the project your own.
- Apply a thin layer of Mod Podge on your tree, and then apply your cut scrapbook sheet. Pay attention to placement.
- Use a squeegee or flat edge tool, pressing down to push or any excess Mod Podge under the paper.
- Wipe the excess from your squeegee and on your tree with a paper towel.
- Repeat for the remaining layers of your tree.
- Use a sanding block to remove any excess overhang of your scrapbook pages on your tree.
- You can also rough up the edges of your tree layers with the sanding block, to add a rustic feel if you desire.
- Rub excess debris so your surface is clean.
- Once you are happy with the look of your tree, seal it with a layer of Mod Podge.
Just pin this DIY Christmas Sign tutorial below to find the instructions later!