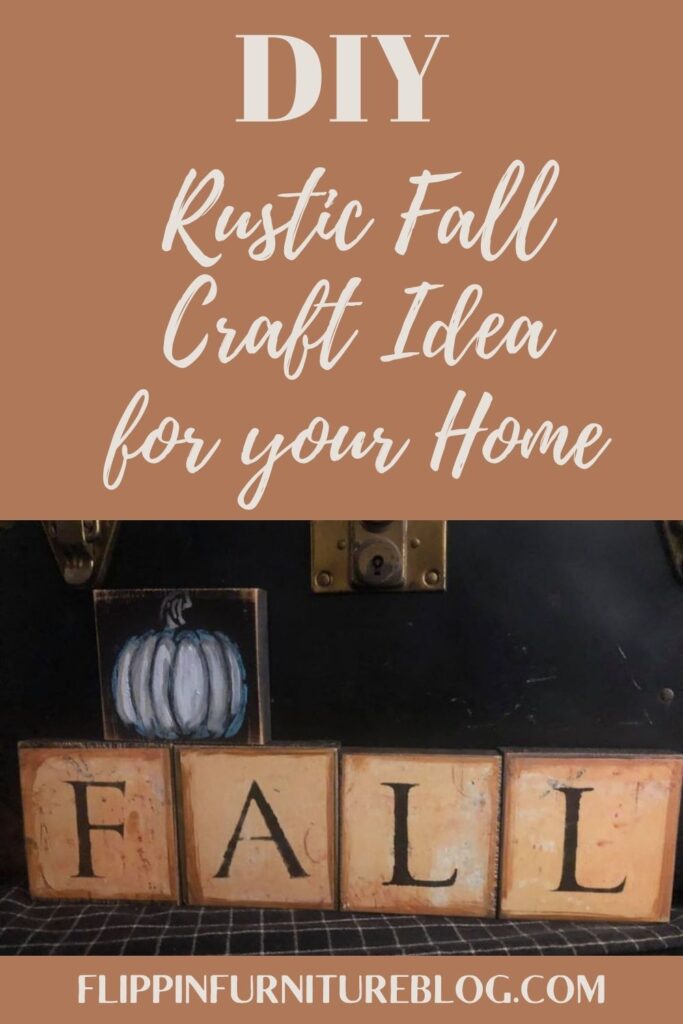
Rustic Fall Craft Idea for your home
Let’s get crafting! Fall is here and I am going to show you how simple it can be to make some rustic home decorations that will add a perfect touch of autumn style with some added charm. This rustic fall craft decor is super easy and perfect to add to your autumn decor.
I love all the feels that rustic home decor offers. I really do love it. It just makes me feel happy and at home every time I see it. When looking to decorate your home with more of a fall vibe and less Halloween decor then this is the perfect DIY rustic fall craft.
Rustic Fall Craft Idea for your home
Using old wood blocks, of any size you like, some fun scrapbook paper, and a few other crafting supplies, you can make this adorable fall rustic craft decorate any room of your house. I can’t wait to put mine on my bookshelf, but it would look great on my mantle, kitchen table, guest bathroom, or even my front entryway. This project lets you be as creative as you want to be, building your confidence, one craft at a time. Just follow the steps below and let’s have some fun!
Supplies needed for your Rustic Fall Craft Decor:
- 5 wooden blocks – 3 ½” squares (size optional)
- Brown, Antique Bronze, and White acrylic paint
- Foam Paintbrush
- Heat Gun/dryer
- Scrapbook paper
- Paper cutter
- Mod Podge
- Squeegee/Flat edge tool
- Sanding block
- Finger daubers
- Letter Stencils – “F, A, L”
- Pumpkin Stencil
- Crafting Pencil
- Fast Drying Acrylic Spray Seal
Steps:
- First let’s grab your desired size wood block. You can use scrap wood if you like. Mine were cut at 3 ½” by 3 ½”. Just make sure your wood pieces can sand up by themselves.
- Now start painting the edges brown with your foam brush.
- Next paint 1 of your wooden blocks completely.
- Decide on which style of scrapbook paper you want to have as the background for your blocks.
- Cut 5 squares of your scrapbook paper to fit the size of your wooden blocks.
- Be sure your paint that you painted has dried completely before moving onto the next step. Use a heat gun to speed up the drying process.
- Doing 1 block at a time, apply a thin coat of Mod Podge on your wooden block being sure to cover the entire front surface.
- Place your scrapbook paper on top. Use a squeegee or flat edge tool, pressing down to push or any excess Mod Podge under the paper.
- Wipe the excess from your squeegee and on your block with a paper towel.
- Help position your papers as you press in case they shift a bit. Repeat for your 4 blocks.
- Rough up the edges of your block with a sanding block to continue with our rustic feel. Rub off any excess debri
- Lightly going around the outside edges of your wood blocks, apply a thin layer of antique bronze paint.
- With your finger paint dauber, start applying the brown paint we used at the beginning of the project. Simply dab a little paint inside your stencil working with the letter “F” first.
- Keep repeating those same steps until you have spelled out “FALL” on your 4 wooden blocks. Set aside to dry.
- Grab your solid brown colored wooden block and be sure it is nice and dry.
- With a pumpkin stencil of your choosing, place over the top of your wood block. Dab on your paint color of choice that will match with your scrapbook paper, holding in place as you work. I am using a mixture of blue and orange to create my pumpkin.
- This is where I filled the inner sections of the pumpkin with a lighter paint than what you chose for the stencil.
- Next, Dry with a heat gun.
- Use a crafting pencil to trace over the pumpkin grooves to add more dimension. With your finger, smudge the pencil a bit.
- Next, add some highlights with your white paint, if you prefer.
- Using Mod Podge after your paint is dry apply a layer over your letter blocks and seal them.
- Return to your pumpkin block, roughing up the edges a bit with a sanding block.

Rustic Fall Craft Decor
Learn how to make this Fall Craft Decor for your home
Materials
- 5 wooden blocks - 3 ½" squares (size optional)
- Brown, Antique Bronze, and White paint
- Foam Paintbrush
- Heat Gun/dryer
- Scrapbook paper
- Paper cutter
- Mod Podge
- Squeegee/Flat edge tool
- Sanding block
- Finger daubers
- Letter Stencils - “F, A, L”
- Pumpkin Stencil
- Crafting Pencil
- Fast Drying Acrylic Spray Seal
Instructions
- Grab your desired size wood block. You can use scrap wood if you like. Mine were cut at 3 ½" by 3 ½". Just make sure your wood pieces can sand up by themselves.
- Begin by painting the edges brown with your foam brush.
- Paint 1 of your wooden blocks completely.
- Decide on which style of scrapbook paper you want to have as the background for your blocks. I always have the hardest time with this part, but this is where you make the project your own.
- Cut 5 squares of your scrapbook paper to fit the size of your wooden blocks.
- Be sure your paint has dried completely before moving onto the next step. Use a heat gun to speed up the drying process.
- Doing 1 block at a time, apply a thin coat of Mod Podge on your wooden block being sure to cover the entire front surface.
- Place your scrapbook paper on top. Use a squeegee or flat edge tool, pressing down to push or any excess Mod Podge under the paper.
- Wipe the excess from your squeegee and on your block with a paper towel.
- Help position your papers as you press in case they shift a bit.
- Repeat for your 4 blocks.
- Rough up the edges of your block with a sanding block to continue with our rustic feel.
- Rub excess debris so your surface is clean.
- Lightly going around the outside edges of your wood blocks, apply a thin layer of antique bronze paint.
- With your finger paint dauber, start applying the brown paint we used at the beginning of the project. Simply dab a little paint inside your stencil working with the letter “F” first.
- Repeat until you have spelled out “FALL” on your 4 wooden blocks. Set aside to dry.
- Grab your solid brown colored wooden block and be sure it is nice and dry.
- With a pumpkin stencil of your choosing, place over the top of your wood block. Dab on your paint color of choice that will match with your scrapbook paper, holding in place as you work. I am using a mixture of blue and orange to create my pumpkin.
- Using a thin paintbrush, fill in the inner sections of your pumpkin with a lighter paint than what you chose for the stencil.
- Dry with a heat gun.
- Use a crafting pencil to trace over the pumpkin grooves to add more dimension. With your finger, smudge the pencil a bit.
- Add some highlights with your white paint, if you prefer.
- When your paint is completely dry on your lettered blocks, seal them with a layer of Mod Podge.
- Return to your pumpkin block, roughing up the edges a bit with a sanding block.
- Seal the block once dry.
See how simple and cute the rustic style can be? A change of stencil, scrapbook paper, and paint can help create a seasonal set for any home. I am really inspired now! The possibilities are endless.
Pin this Rustic Fall Craft Decor tutorial below to find the instructions later!