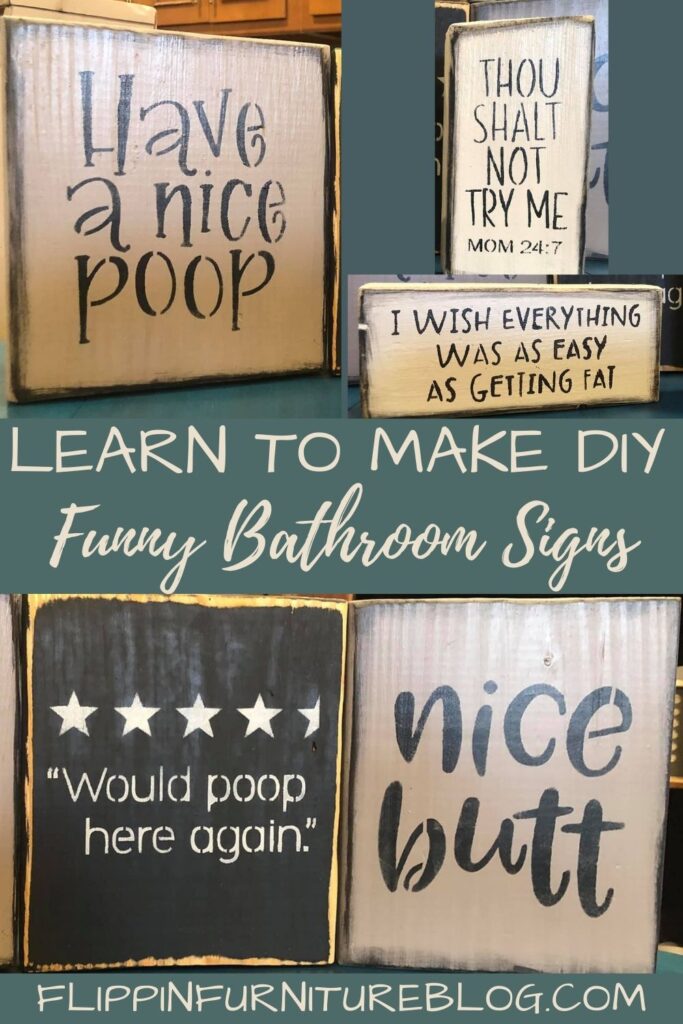
DIY Funny Bathroom Signs
Follow along step by step as I show you how to make a few DIY funny bathroom decor signs for your home. This simple craft will make those chuckle while taking care of business.
Are you able to say the word DUTY without having a little smile come across your face? You know like, “I have a big duty I need to take care of at work?” If you have a smirk on your face right now as you read this, then these DIY Funny Bathroom signs are for you. Because come on, DOOTIE is a hilarious word and clean potty talk is always funny. So, stinking funny if you ask me!

DIY Funny Bathroom Signs
Painting pieces of wood of all shapes and sizes makes me happy. Adding a little stencil on top with a funny little, slightly immature saying, is pretty great too. Making several options of these DIY Funny Bathroom Signs could be my personal definition of a little bit of heaven. If this describes you as well, then you and I are certain to make the best of friends. I am so glad you are here to participate in this DIY tutorial that is bound to make whoever enters your bathroom leave with a smile.
Scrap wood comes in all shapes and sizes. As do stencils. So when creating this project, just be sure to find the perfect fit to create what you’re looking for. If you don’t have access to scrap wood, your local craft store most sells all sorts of sizes to create your own DIY signs. With the choice of base color paint to coordinate with your old or new bathroom decor, this project is very versatile. So, have fun with your paint choices, along with these hilarious little comments. Be prepared for these signs to be the start of some funny conversations in your future.
Just follow the steps below and have some fun! One question though. Would your mother and father approve of such potty talk? Ha! Mine would. That is why I have such a silly sense of humor! Happy crafting y’all.
Supplies needed to make your own DIY Funny Bathroom Signs:
- Wooden blocks – scrap lumber of all different sizes
- Fusion Mineral Paint
- Acrylic Paint
- Paintbrush
- Paint daubers
- Makeup Sponges
- Heat Gun/dryer
- Funny Bathroom Stencil Pack (7 Mil Mylar)
- Getting Fat Stencil
- Thou Shalt Not Try Me
- Sanding block
- Spray Polyurethane
Steps:
- Grab your desired size wood blocks that will fit your desired stencils. You can use scrap wood if you like. I am using pieces that are all different sizes, because I am crazy like that.
- With some tan/gray/taupe/navy blue/white paint, give a base coat to your wooden blocks. Cover completely. Don’t forget to do the sides. It doesn’t have to be a thick coat because we will distress the boards.
- Paint your wooden blocks different colors of base coats like me, or keep them all the same shade. It is your preference.
- Dry completely with a heat gun/dryer to speed up the process.
- Touch up any spots that you may have missed.
- With your first bathroom stencil, plan on where you want it to be placed. Play with placement on your wooden board. You can measure it out if you are extra precise, or eyeball it like me.
- With your acrylic paint, begin dabbing out your first stencil. Use finger daubers to stencil best. Makeup sponges work too. Hold stencil in place as you work. You decide your accent paint color. You can’t go wrong with white or blacks.
- Repeat steps with your next boards, as you stencil on with your next color of choice. I have used base coats of greys and navy blue for my color palette. My accent colors for my letters are black and titanium white. But you can do whatever works best for your decor.
- When finished with paint, set aside to dry. Or, use a heat gun or hair dryer to speed up the drying process.
- To distress your blocks, grab your sanding block/electric sander and rub along the edges. Distress as much as you like.
- You could use the finger daubers with a bit of excess paint on them to create some dimension along the edges. Just simply rub along the edges adding a bit of character to each one.
- Carefully wipe your blocks of any debris, paying attention not to smear your paint.
- Once completely dry, apply a thin layer of Spray Polyurethane. Do this in a well ventilated area. I really like the DIxie Bell product. Let dry.
- If you feel your blocks need a little more, feel free to add some twine, jute, string, or even ribbon of your liking, and unravel a bit so you have some to wrap easily. Apply a thin line of hot glue to start your wrapping, to help it stay in place. Wrap around several times to make it thick. Cut and hot glue the end to secure.
- Last but not least, enjoy your simple DIY Funny Bathroom Signs, while you know… pooping.

DIY Funny Bathroom Signs
Do you have a sense of humor? Make your own funny bathroom signs with this simple stenciling technique.
Materials
- Wooden blocks - scrap lumber of all different sizes
- Chalk Type paint - Gray/Tan/taupe/navy blue/white/etc* neutral color to match home decor
- Black, white, off-white, etc* acrylic paint for stencils
- Paintbrush
- Paint daubers (amazon)
- Makeup Sponges
- Heat Gun/dryer
- Funny Bathroom Stencil Pack (7 Mil Mylar)
- Sanding block/Electric sander
- Spray Polyurethane
Instructions
- Grab your desired size wood blocks that will fit your desired stencils. You can use scrap wood if you like. I am using pieces that are all different sizes, because I am crazy like that.
- With some tan/gray/taupe/navy blue/white paint, give a base coat to your wooden blocks. Cover completely. Don’t forget to do the sides. It doesn’t have to be a thick coat because we will distress the boards.
- Paint your wooden blocks different colors of base coats like me, or keep them all the same shade. It is your preference.
- Dry completely with a heat gun/dryer to speed up the process.
- Touch up any spots that you may have missed.
- With your first bathroom stencil, plan on where you want it to be placed. Play with placement on your wooden board. You can measure it out if you are extra precise, or eyeball it like me.
- With your acrylic paint, begin dabbing out your first stencil. Use finger daubers to stencil best. Makeup sponges work too. Hold stencil in place as you work. You decide your accent paint color. You can’t go wrong with white or blacks.
- Repeat steps with your next boards, as you stencil on with your next color of choice. I have used base coats of greys and navy blue for my color palette. My accent colors for my letters are black and titanium white. But you can do whatever works best for your decor.
- When finished with paint, set aside to dry. Or, use a heat gun or hair dryer to speed up the drying process.
- To distress your blocks, grab your sanding block/electric sander and rub along the edges. Distress as much as you like.
- You could use the finger daubers with a bit of excess paint on them to create some dimension along the edges. Just simply rub along the edges adding a bit of character to each one.
- Carefully wipe your blocks of any debris, paying attention not to smear your paint.
- Once completely dry, apply a thin layer of Spray Polyurethane. Do this in a well-ventilated area. I really like the DIxie Bell product. Let dry.
- If you feel your blocks need a little more, feel free to add some twine, jute, string, or even ribbon of your liking, and unravel a bit so you have some to wrap easily. Apply a thin line of hot glue to start your wrapping, to help it stay in place. Wrap around several times to make it thick. Cut and hot glue the end to secure.
- Last but not least, enjoy your simple DIY Funny Bathroom Signs, while you know… pooping.
Ok, ok. These may or may not be your style. But the best part of this is that the tutorial is simple for any set of stencils. If you find a stencil you prefer instead, use it! I am a big believer in DIYing it, instead of flat-out buying it. It doesn’t need to cost so much money to decorate your home with cute, simple, fun decor. And you don’t have to keep these signs for yourself! These personalized wood signs would make a great housewarming gift. I hope you had as much fun as I did making these. I also hope you smiled a little bit white stenciling the words, “Nice Butt!” So stinking hilarious. Ha! Thanks so much for crafting with me. Until next time.
Just pin this DIY Funny Bathroom Signs tutorial below to find the instructions later!


2 Comments
Mercedes Daniels
Where would you recommend for buying more/other stencils?
I love watching you. Really like your designs. And I LOVE your no fuss, honest attitude! I hope you never change!
Mercedes Daniels
Houston, Texas
859-409-4356
Flippin Furniture Blog
This is where I get 99% of my stencils – https://www.thestencilsmith.com?aff=6
They just started a sale today 20% off!