DIY Home Decor Ideas
Finding some simple and easy DIY home decor ideas can really be a blessing. When you are wanting to change up some of your home decor and need it to be on a budget then try these DIY decor tutorials, I am positive you will love them!
If you’re like me, you love to decorate your home but don’t always have the money to buy everything you want. Here are some DIY home decor ideas that will help cheer up your space without breaking the bank.
DIY Home Decor Ideas
I love seeing uplifting quotes and sayings in my home. They bring me so much joy and really help me have a positive attitude throughout my day. If you too love that, then these DIY home decor signs will be perfect for your home as well.
When you are needing to change up your decor, you can simply make that change using some stencils, floral transfers, and a little paint. I have lots of signs that I change out throughout the year. That gives me a new look when I am wanting, and more decor items to rotate.
The best thing about these DIY wood signs is they can even be used on tiered trays, cocoa bars, mantels, and coffee tables. You can find many different ways to style and decorate wood signs.
Give this tutorial a try and you too will see that the possibilities are endless when it comes to some stencils, floral transfers, paint, and wooden blanks.
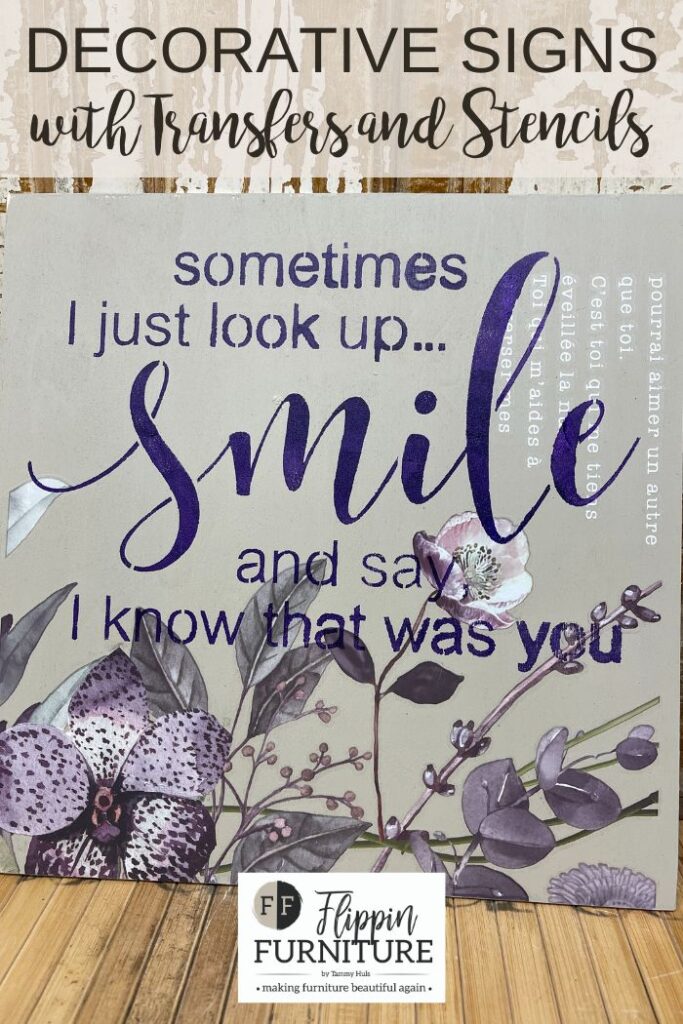
How to Use Floral Transfers and Stencils to Make a Sign
Supplies:
- Wood Blank, Cabinet Door, or Window
- Stencil with Words or Quote
- Vigorous Violet Floral Transfers
- Transfer Applicator
- Acrylic Paint
- Jumbo Daubers
- Sanding Block
- Scissors
Steps:
- Spread out your vigorous violet floral transfer and cut out each floral design that you want to transfer. Cut out any elements you don’t want to use.
- Align the stencil over the floral transfer paper to find the right placement. Trim the extra off. Pull off the backing and be careful that it doesn’t fold over and stick to itself.
- Stick the floral transfers onto your sign backing and use the transfer tool to press the design onto the backing. Pull back the top layer to make sure it is sticking. Remove the top layer and sand any excess off the edges.
- Place the stencil on top of the tile and use your deep purple paint and user your dauber to dab into the words.
- Take the purple flower you cut out earlier and remove the backing. Place in the lower left-hand corner and use your transfer tool to transfer it onto your sign. Pull off the plastic to make sure the transfer worked. Trim the bottom and sand the extra on the edge.
How to Use Floral Transfers and Stencils to Make a Sign
Materials
Instructions
- Spread out your Vigorous Violet transfer and cut out each floral design that you want to transfer. Cut out any elements you don’t want to use.
- Align the stencil over the floral transfer paper to find the right placement. Trim the extra off. Pull off the backing and be careful that it doesn’t fold over and stick to itself.
- Stick the floral transfers onto your sign backing and use your transfer tool to press the design onto the backing. Pull back the top layer to make sure it is sticking. Remove the top layer and sand any excess off the edges.
- Place the stencil on top of the tile and use your deep purple paint and stencil brush to dab into the words.
- Take the purple flower you cut out earlier and remove the backing. Place on the lower left-hand corner and use your transfer tool to transfer onto your sign. Pull of the plastic to make sure the transfer worked. Trim the bottom and sand the extra on the edge.
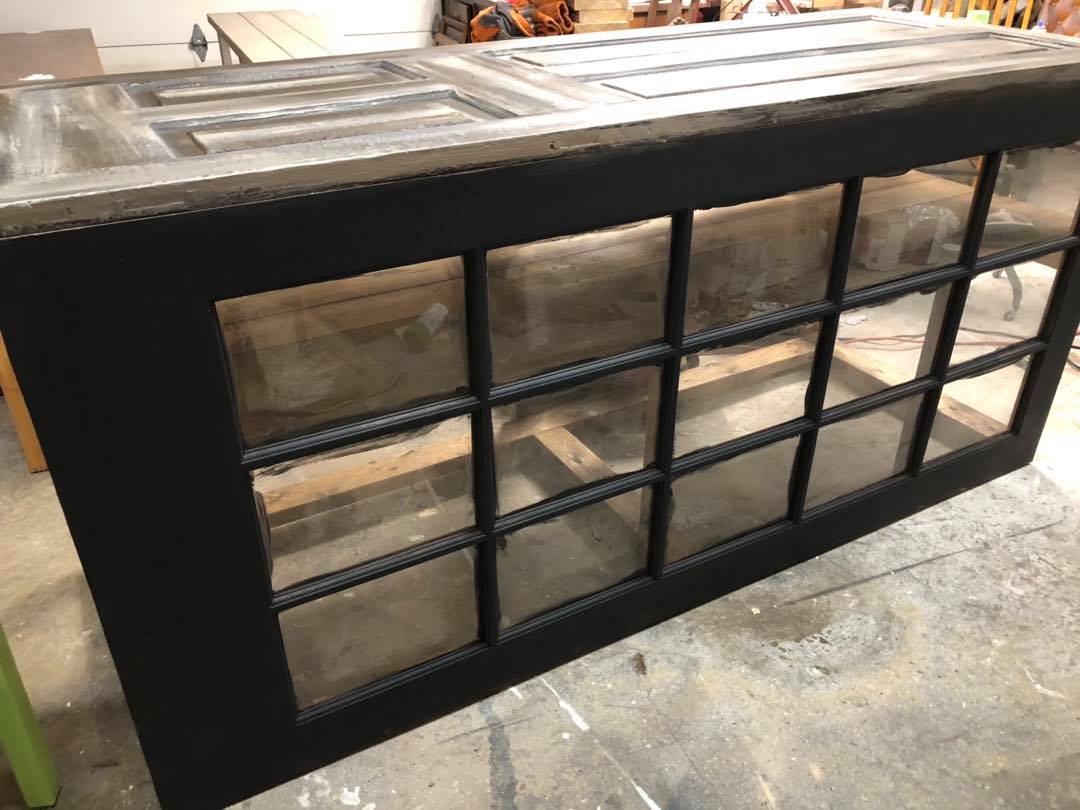
How to Use Floral Transfers and Stencils on an old Window or Cabinet Door
Supplies
- Old Window or Cabinet Door with Wooden Frame
- Cosmic Roses Floral Transfer
- “Smile” Quote – Stencil
- Fusion’s Bayberry Paint
- Master’s Touch Acrylic Paint
- Transfer Tool
- Jumbo Dauber
- Heat Gun/Blow Dryer
- Scissors
Steps:
- Remove the knob on your window with a screwdriver from the back. Clean the glass with glass cleaner. You can also paint the back of your window to make it all pop! I painted mine Fusion’s Bayberry.
- Pick which floral transfers you’d like to use on your window and cut them out with scissors. Pull the backing off and don’t let it come in contact with itself. Place on the glass and cut off any extra to fit.
- Use a transfer tool and press it out to adhere to the glass completely. Pull off the sticky top and push down any transfers that didn’t release and adhere to the glass. Push out any air bubbles.
- Once you’ve added your floral transfers, if you want to add any extra transfers to the piece, just cut out from your paper and repeat the same process to adhere the transfer to the glass. Be careful not to scratch any previous transfers.
- Place the stencil onto the glass where you would like it. Use the dauber to dab your paint into the words. Remove the stencil and wipe off any extra paint. Use the blow dryer or heat gun to dry.
- Place the stencil back onto the glass where you previously painted and offset it just a little. Use a white paint to go over the letters and make them pop.
How to Use Floral Transfers and Stencils on an old Window or Cabinet Door
Materials
- Old Window or Cabinet Door with Wooden Frame
- Fusion Bayberry Mineral Paint
- Master's Touch Acrylic Paint
- Cosmic Roses Transfer
- "Smile" Stencil
- Transfer Tool
- Paintbrush
- Scissors
Instructions
- Remove the knob on your window with a screwdriver from the back. Clean the glass with glass cleaner. You can also paint the back of your window to make it all pop! I painted mine Fusion's Bayberry.
- Pick which floral transfers you’d like to use on your window and cut them out with scissors. Pull the backing off and don’t let it come in contact with itself. Place on the glass and cut off any extra to fit.
- Use a transfer tool and press it out to adhere to the glass completely. Pull off the sticky top and push down any transfers that didn’t release and adhere to the glass. Push out any air bubbles.
- Once you’ve added your floral transfers, if you want to add any extra transfers to the piece, just cut out from your paper and repeat the same process to adhere the transfer to the glass. Be careful not to scratch any previous transfers.
- Place the stencil onto the glass where you would like it. Use the dauber to dab your paint into the words. Remove the stencil and wipe off any extra paint. Use the blow dryer or heat gun to dry.
- Place the stencil back onto the glass where you previously painted and offset it just a little. Use a white paint to go over the letters and make them pop.
Video
Just pin this DIY Home Decor Idea tutorial below to find the instructions later!